In December 2025, I learned from a comment by hikers (see comments) that the ridge trail over the Igonse is officially closed. If anyone has any new information in the future, please let me know or comment here. As this is a private blog, I cannot check all the trails and other hikers are dependent on your help. Thank you very much.
Many ways to get to Pico Igonse
The summit of Pico Igonse is 1410 metres high. It is not marked with a cross or a surveyor’s pillar, which may be due to the fact that this peak is part of a mountain ridge. This ridge continues upwards to the Cumbre Dorsal of Tenerife. Nevertheless, Pico Igonse is an impressive peak that you can reach from three routes. There are two routes from Araya, a small town above Candelaria.
Map

Ascent to the summit of Pico Igonse
These two routes can be combined beautifully as an ascent and descent route to form a circular tour. However, you can also get to Pico Igonse from „above“. I have described a circular walk high above Candelaria on the Seven Islands. From there you can ascend or descend to Pico Igonse in a short time. As you can see, there are several ways to get to Pico Igonse. You can find more information below under the point Variants.

Steep climb into the clouds
Circular hike Pico Igonse – steep and not for everyoneos
Today I will describe a circular walk that starts and ends in the small town of Araya via Candelaria. You first hike uphill from Araya in the direction of Area Recreativa Los Brezos. The normal road ends there. From there you continue to climb until you cross a small barranco. From there, a short time later, the climb is very steep on a ridge. Fortunately, we didn’t have any rain during the ascent, but there were clouds around us, which you can see in the pictures.

Hikers on the Way - Pico Igonse
After you reach Pico Igonse at the end without a path, you go down again on a very steep ridge path to Araya. The descent path is a little difficult to find in parts, but ultimately doable, as long as you always orient yourself to the ridge. As you can see from this description, it is a difficult hike and not feasible for everyone.
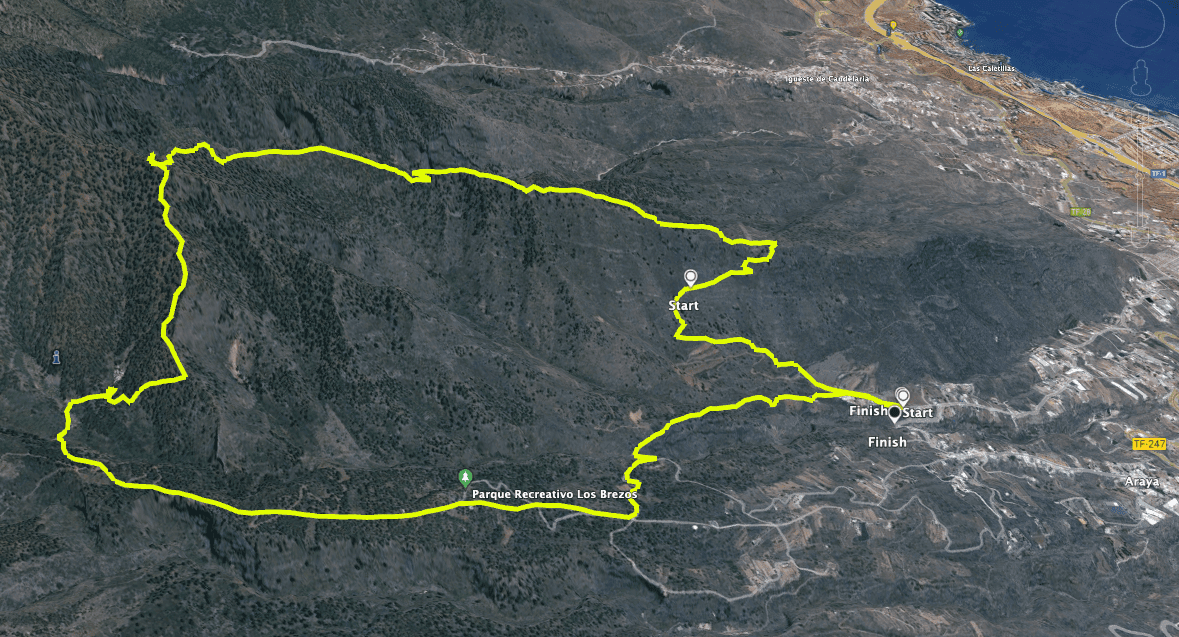
Track of the Pico Igonse circular
General information about the Pico Igonse circular hike
Starting point and approach
The starting point of the hike is the small village of Araya above Candelaria on the Calle Araya. GPS: 28.368960 -16.396831. You can also start a little further down the road.

Starting point at the bottom of the Pi Araya road - the trail starts there, up to the road, or at the top of the road.
Arrival by car
Coming from the north or south on the TF-1, exit at Candelaria, Araya. From there, follow the TF-247 and the signs to Araya until you reach the village of Araya. You turn right uphill from the TF-247 and then just go uphill to the starting point. We started this hike very high up on the road. You can also park a little further down the road. There is a car park in the barranco. From there you can take a signposted hiking trail up to the road (starting point here).
Arrival by bus
The Titsa bus 123 goes to Araya and stops at TF-247, so you still have to walk up through the village to the starting point. Details and more information can be found on the Titsa homepage. Time
I don’t like to give general schedules for hiking routes, as the schedules are very individual. We needed exactly 6 hours for this hike with an extensive stop at the summit.
Altitude difference and route length
Article summary and large selection of GPS hiking tracks
Sign up for my newsletter now and get exclusive access to my collected GPS tracks as well as all the brief information about my articles.
Sign up nowThe difference in altitude is about 990 metres and the route is just under 11 kilometres long.

Hiking signs at Araya La Mesa SL TF 296
Requirements
Even though the route is only 11 kilometres long, these kilometres are quite demanding. Especially the ascent and the descent are very steep on narrow paths. Surefootedness and a head for heights are absolutely necessary. On the descent path, which could also be your ascent path, the path is sometimes very difficult to find. You must be in good physical condition.
Refreshment stops
Restaurants, bars and shops can be found in Araya, if they are open. Therefore, be sure to bring enough water and food for the round trip.
Variants
The round tour described here can of course be done in both directions. Personally, I would prefer the variant described here, as it gives you a more leisurely ascent. The ascent trail is actually very steep in some places, so I wouldn’t necessarily want to go back down it. On the descent trail, the paths are easier to find on the way down than on the way up. But you may see and feel that quite differently. Of course, you can also just walk up and down the ascent or descent path.
Finally, there is the combination with my circular walk high above Candelaria described on Seven Islands. You climb up on one of the two paths from Araya to Pico Igonse and continue your way from there. This will take you to the TF-24. From there you can return by car, bus or taxi. This variant is of course also suitable for people who prefer to descend rather than ascend, in the opposite direction.

Descent path from Pico Igonse already further down near the power poles and La Mesa
Circular hike Pico Igonse
Araya section to the road to Area Recreativa Los Brezos
You start your circular walk somewhere on Calle Pl Araya and walk uphill. If you park at the bottom of the Barranco, you can also take a small hiking trail up to the road. You walk until shortly before the Finca Las Haciendas. There, the hiking trail leads you off the road to the left. The signs point to Igonce Los Brezos (2.6 km). You hike downhill for a short while and then reach a concrete road. This takes you up a very steep incline past some fincas and fenced land.

Hiking trail - start at the bottom of the road
You come to a covered canal, which you cross. The trail continues straight uphill. You walk over a ridge between the Barranco de las Vigas or Barranco de Igonse (right) and the Barranquillo de Jeban (left). Already during this ascent you have beautiful views of the mountains in front of you, the gorges next to you or the coast behind you. At the end of the ridge trail, you will reach a small road.

Hiking Pico Igonse
Road section to Area Recreativa Los Brezos to Barranco Archacay/Barranco Chese ridge
Follow the road uphill to the right for a while. There is hardly any traffic here. At the next small intersection, keep to the right. This road leads you uphill directly to the Area Recreativa Los Brezos. However, you don’t have to follow all the twists and turns of the road. Marked hiking trails shorten all the twists and turns of the road so that you reach the Los Brezos rest area on a straight path. You don’t have to bypass this on the road either, but can cross it straight past a small white chapel.

Area Recreativa Los Brezos and the small chapel of San Isidro
At the end of Los Brezos, you will come to a wide road that takes you further uphill. After a short while, this becomes a hiking trail that leads you uphill on a ridge close to the edge of the Barranco Achacay (Chese). You can enjoy fantastic views down into the barranco. I abseiled down there once a year ago. And you will see that this barranco is really worth seeing from the top.

View into the Barranco Achacay/Barranco Chese from the ascent path behind Los Brezos
Road section to Area Recreativa Los Brezos to Barranco Archacay/Barranco Chese ridge
Article summary and large selection of GPS hiking tracks
Sign up for my newsletter now and get exclusive access to my collected GPS tracks as well as all the brief information about my articles.
Sign up nowFinally, the trail turns right away from the barranco. You cross a small gorge in a wide arc. On the other side of the mountain, a path leads uphill and briefly downhill to cross another small ravine in the forest. On your left is an established field to which several paths lead, so you can easily get a little lost. But just keep on the main path downhill and cross the barranco.

Crossing Barranco los Chupaderos below Pico Igonse with hiking trail
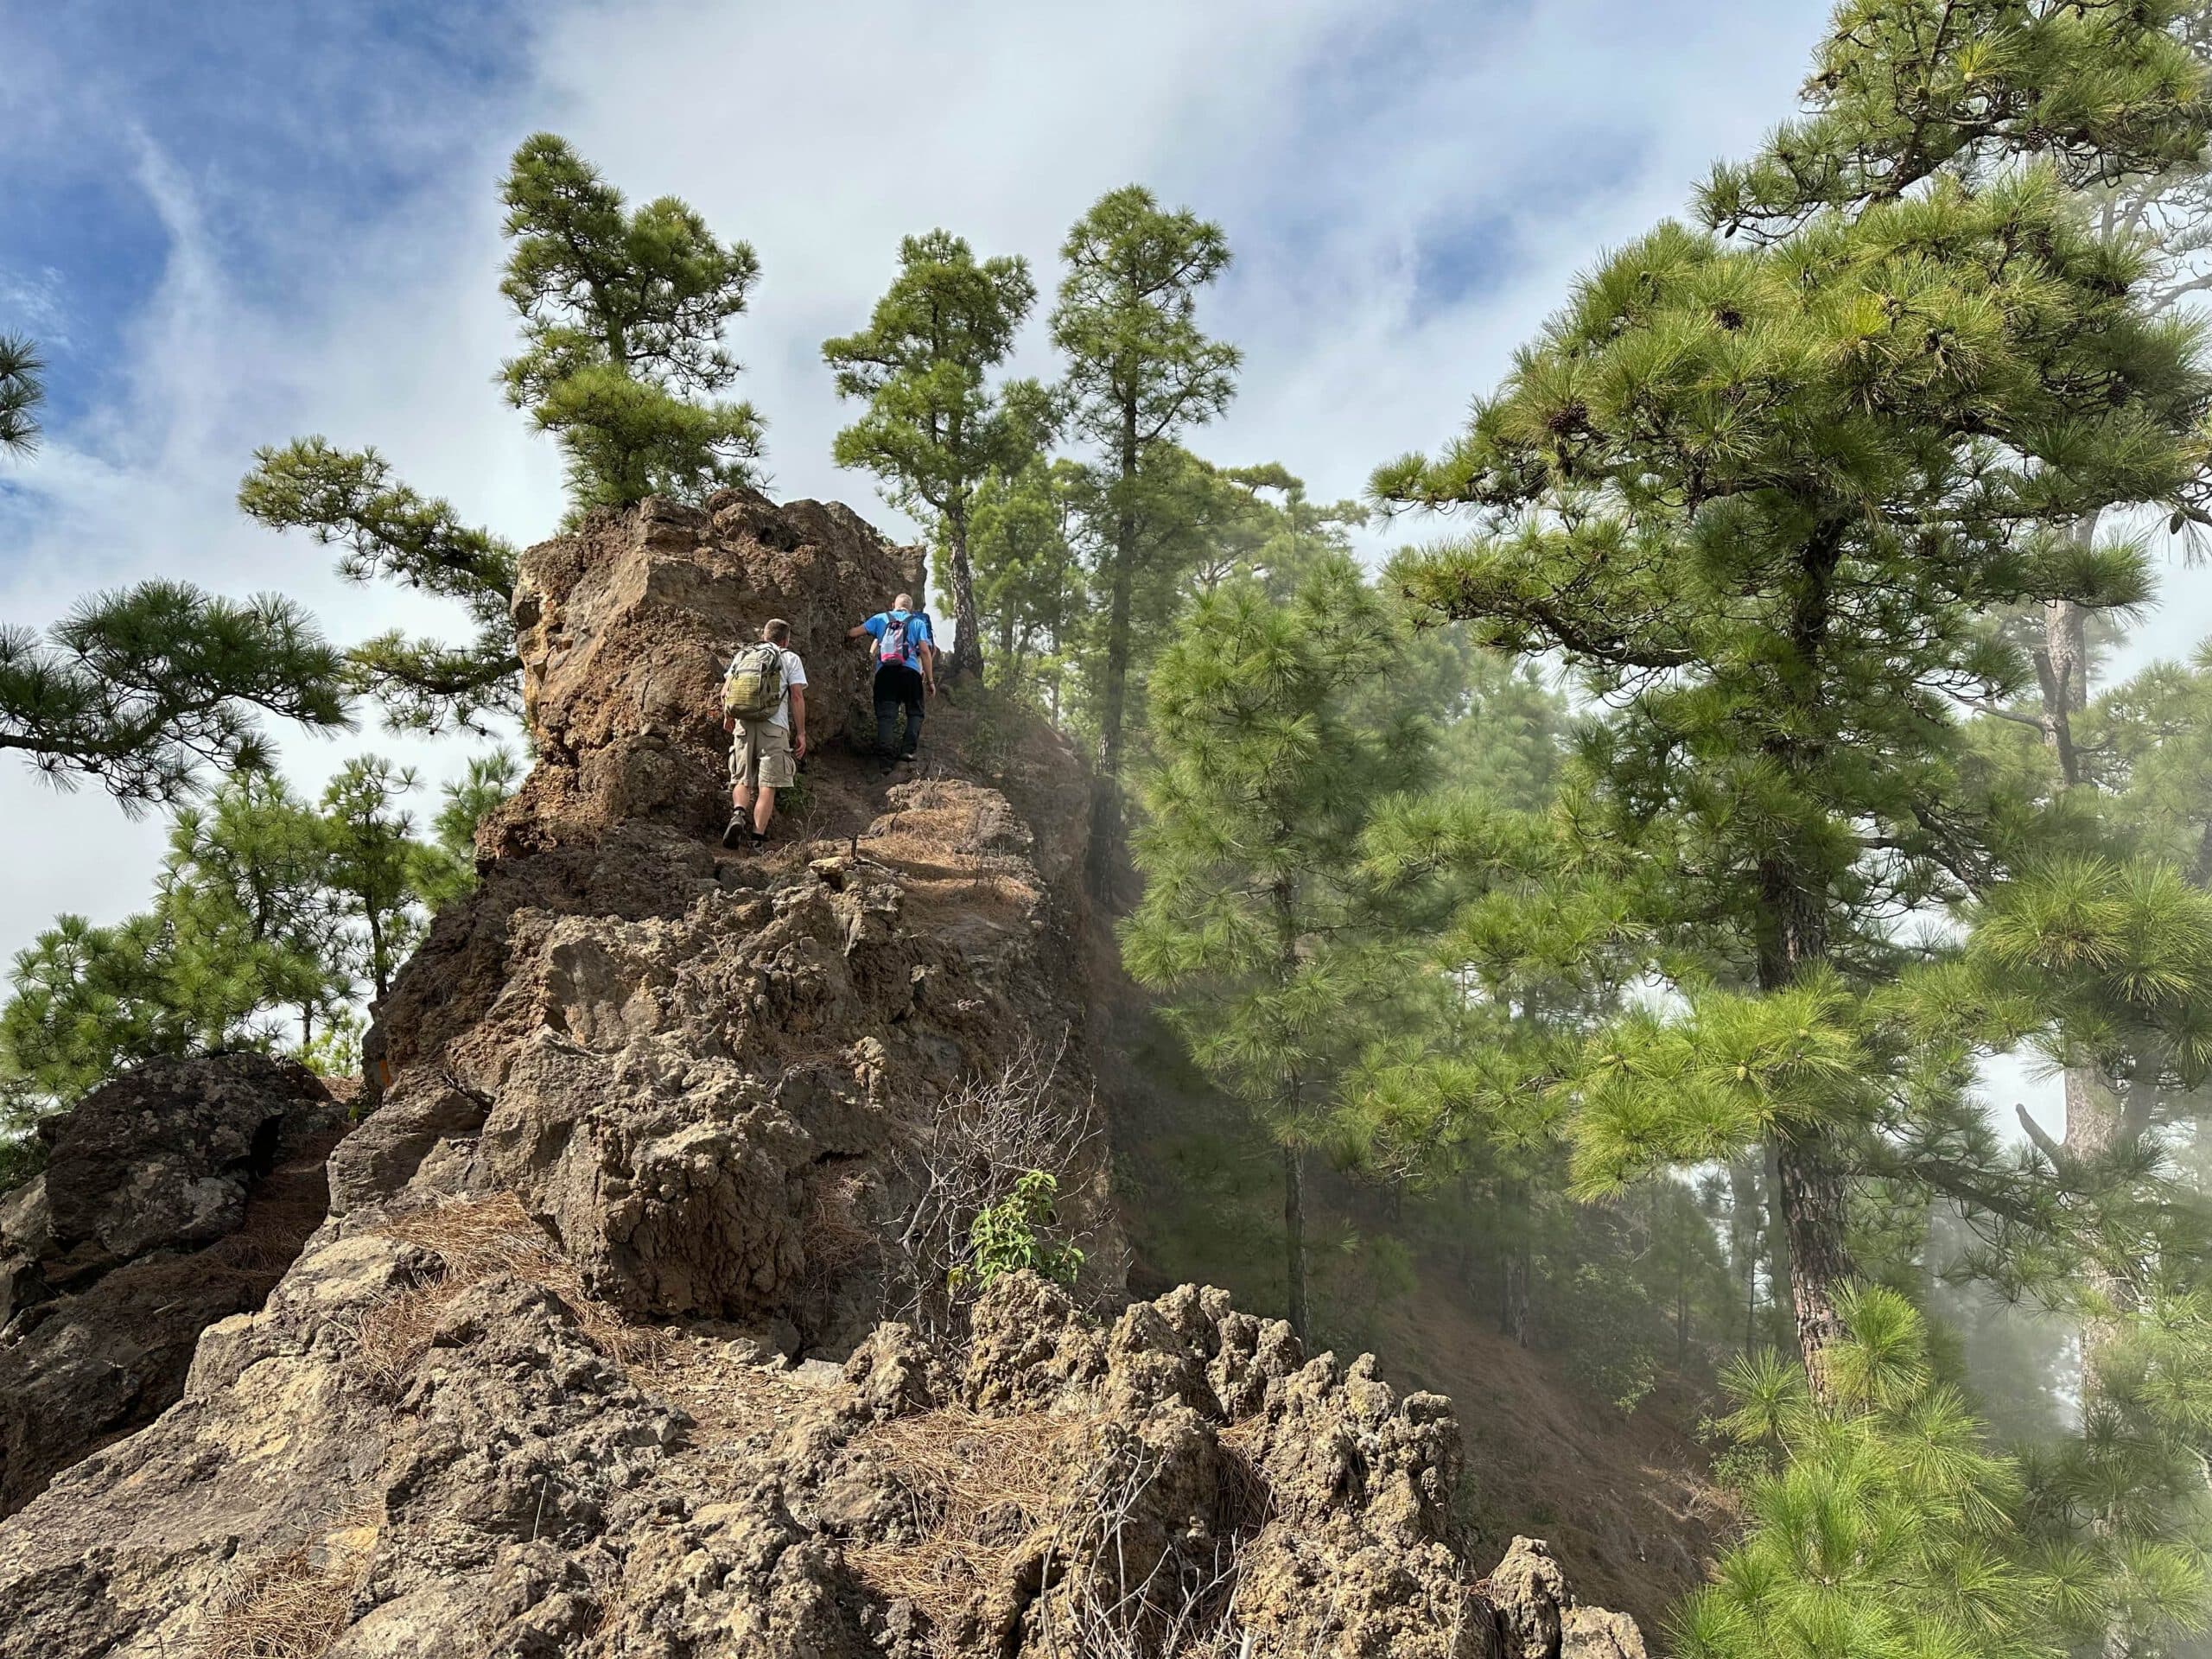
From now on, the path becomes very narrow and steep and sometimes a little difficult to walk because of the many pine needles. It takes you steeply through pine forest to the ridge of Pico Igonse. Once you reach the ridge, you can enjoy beautiful views from up there. However, my view was quite limited by the clouds during the last ascent. Nevertheless, the rugged rocks with the occasional deep views are impressive.

Steep ascent on narrow paths over pine needles to Pico Igonse
Route section Pico Igonse ridge to Igonse peak and return route
The rest of the trail leads you mostly steeply uphill through the pine forest and rugged rocks, always close to the ridge. At the end of the ridge you have almost made it. Your way back goes around to the right. But if you want to climb Pico Igonse, you go around to the left. This path leads you up to the circular walk high above Candelaria.

Summit of Pico Igonse with a meagre view through the clouds to the rest of the ridge
After only a few metres on this path, you can climb uphill to the right to the ridge and the highest point of Pico Igonse (1410 metres altitude). Enjoy the views, take a rest at the summit and be happy that you have made it. From here it’s all downhill. Unless you decide to continue up the ridge. For the round trip, go back the few metres so that you reach the way back to Araya.
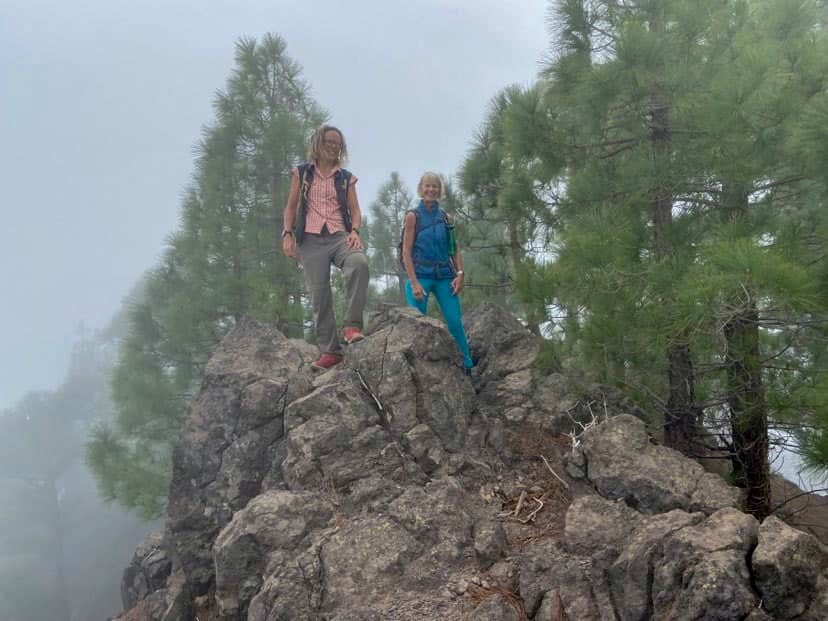
on the top of Pico Igonse
Igonse summit section and return to lower ridge path
The descent on the long ridge path towards Araya or La Mesa is difficult to describe. You can mostly follow the visible small path or cairns, unless you have a GPS track. In general, the path is steeply downhill, always close to the ridge. Now and then on the left and then again on the right. In some places you can only get further by going directly over the ridge. When we tried to climb up from the other side some time ago, I found it more than difficult to even find the way.

Pico Igonse - Hiking along the ridge
In some places, however, it is also a bit tricky in the downward direction, but in the end it is doable. In the lower part of the ridge, you come out of the forest from time to time, hike through scrub forest and cactus fields and can enjoy wonderful views of the east coast of Tenerife all the way to Santa Cruz de Tenerife.

Caves along the way - Pico Igonse
Section lower ridge trail to starting point Araya
Eventually you will see electricity pylons and a power line below you. The gradually flattening path leads you downhill towards them. You will also pass some caves that you can take a look at. Finally, the path ends on terraced fields. You have to keep to the right to overcome the individual terraces. You then pass the electricity pylons and go under the power line. Shortly afterwards, you will meet the official hiking trail at a large cairn near La Mesa.

Last section on the ridge trail down to the power poles above Araya - there the descent trail joins the regular hiking trail SL TF-296.
From there, the trail SL TF-296 leads you around to the right in wide switchbacks downhill towards Araya. The beautiful path, paved with cobbles and offering beautiful views, will eventually take you back down to the canal. Cross the canal and continue straight downhill on the trail. At the end of the path, you will reach the crossroads towards Los Brezos. Immediately after, you will reach the road and thus the starting point of the hike.

Stone Cairn La Mesa
And finally
I hope you enjoyed this exciting circular hike, which is a bit of a scramble in parts. Be careful and only do the tour if you are absolutely sure-footed and free from vertigo. I wish you a safe ascent and descent without clouds and wonderful views. Have fun hiking,
Dagmar from Siebeninseln