Hiking in the Orotava Valley and many trails around Montaña Limón
The Orotava Valley offers you countless hiking possibilities. I have already described the well-known route Órganos Hightrail here on Seven Islands. Because of the numerous hiking trails, many hikes can also be combined very well and adapted to individual length preferences. Map

Orotava Valley - View of forest and rocks from the hiking trail
Today I am also presenting a large circular hike that takes you from the Orotava Valley to Montaña Limón and along an impressive barranco.

View from Montaña Limón
You will find many variations on this hike, so you can plan the right hike for you. If this hike is too long, I present two alternative shorter routes. One takes you into the forest areas around the caldera. The other is an alternative hike to Montaña Limón, which saves you the hard climb from the La Caldera rest area.

Hikers on the descent path Montaña Limón to the offshore peak
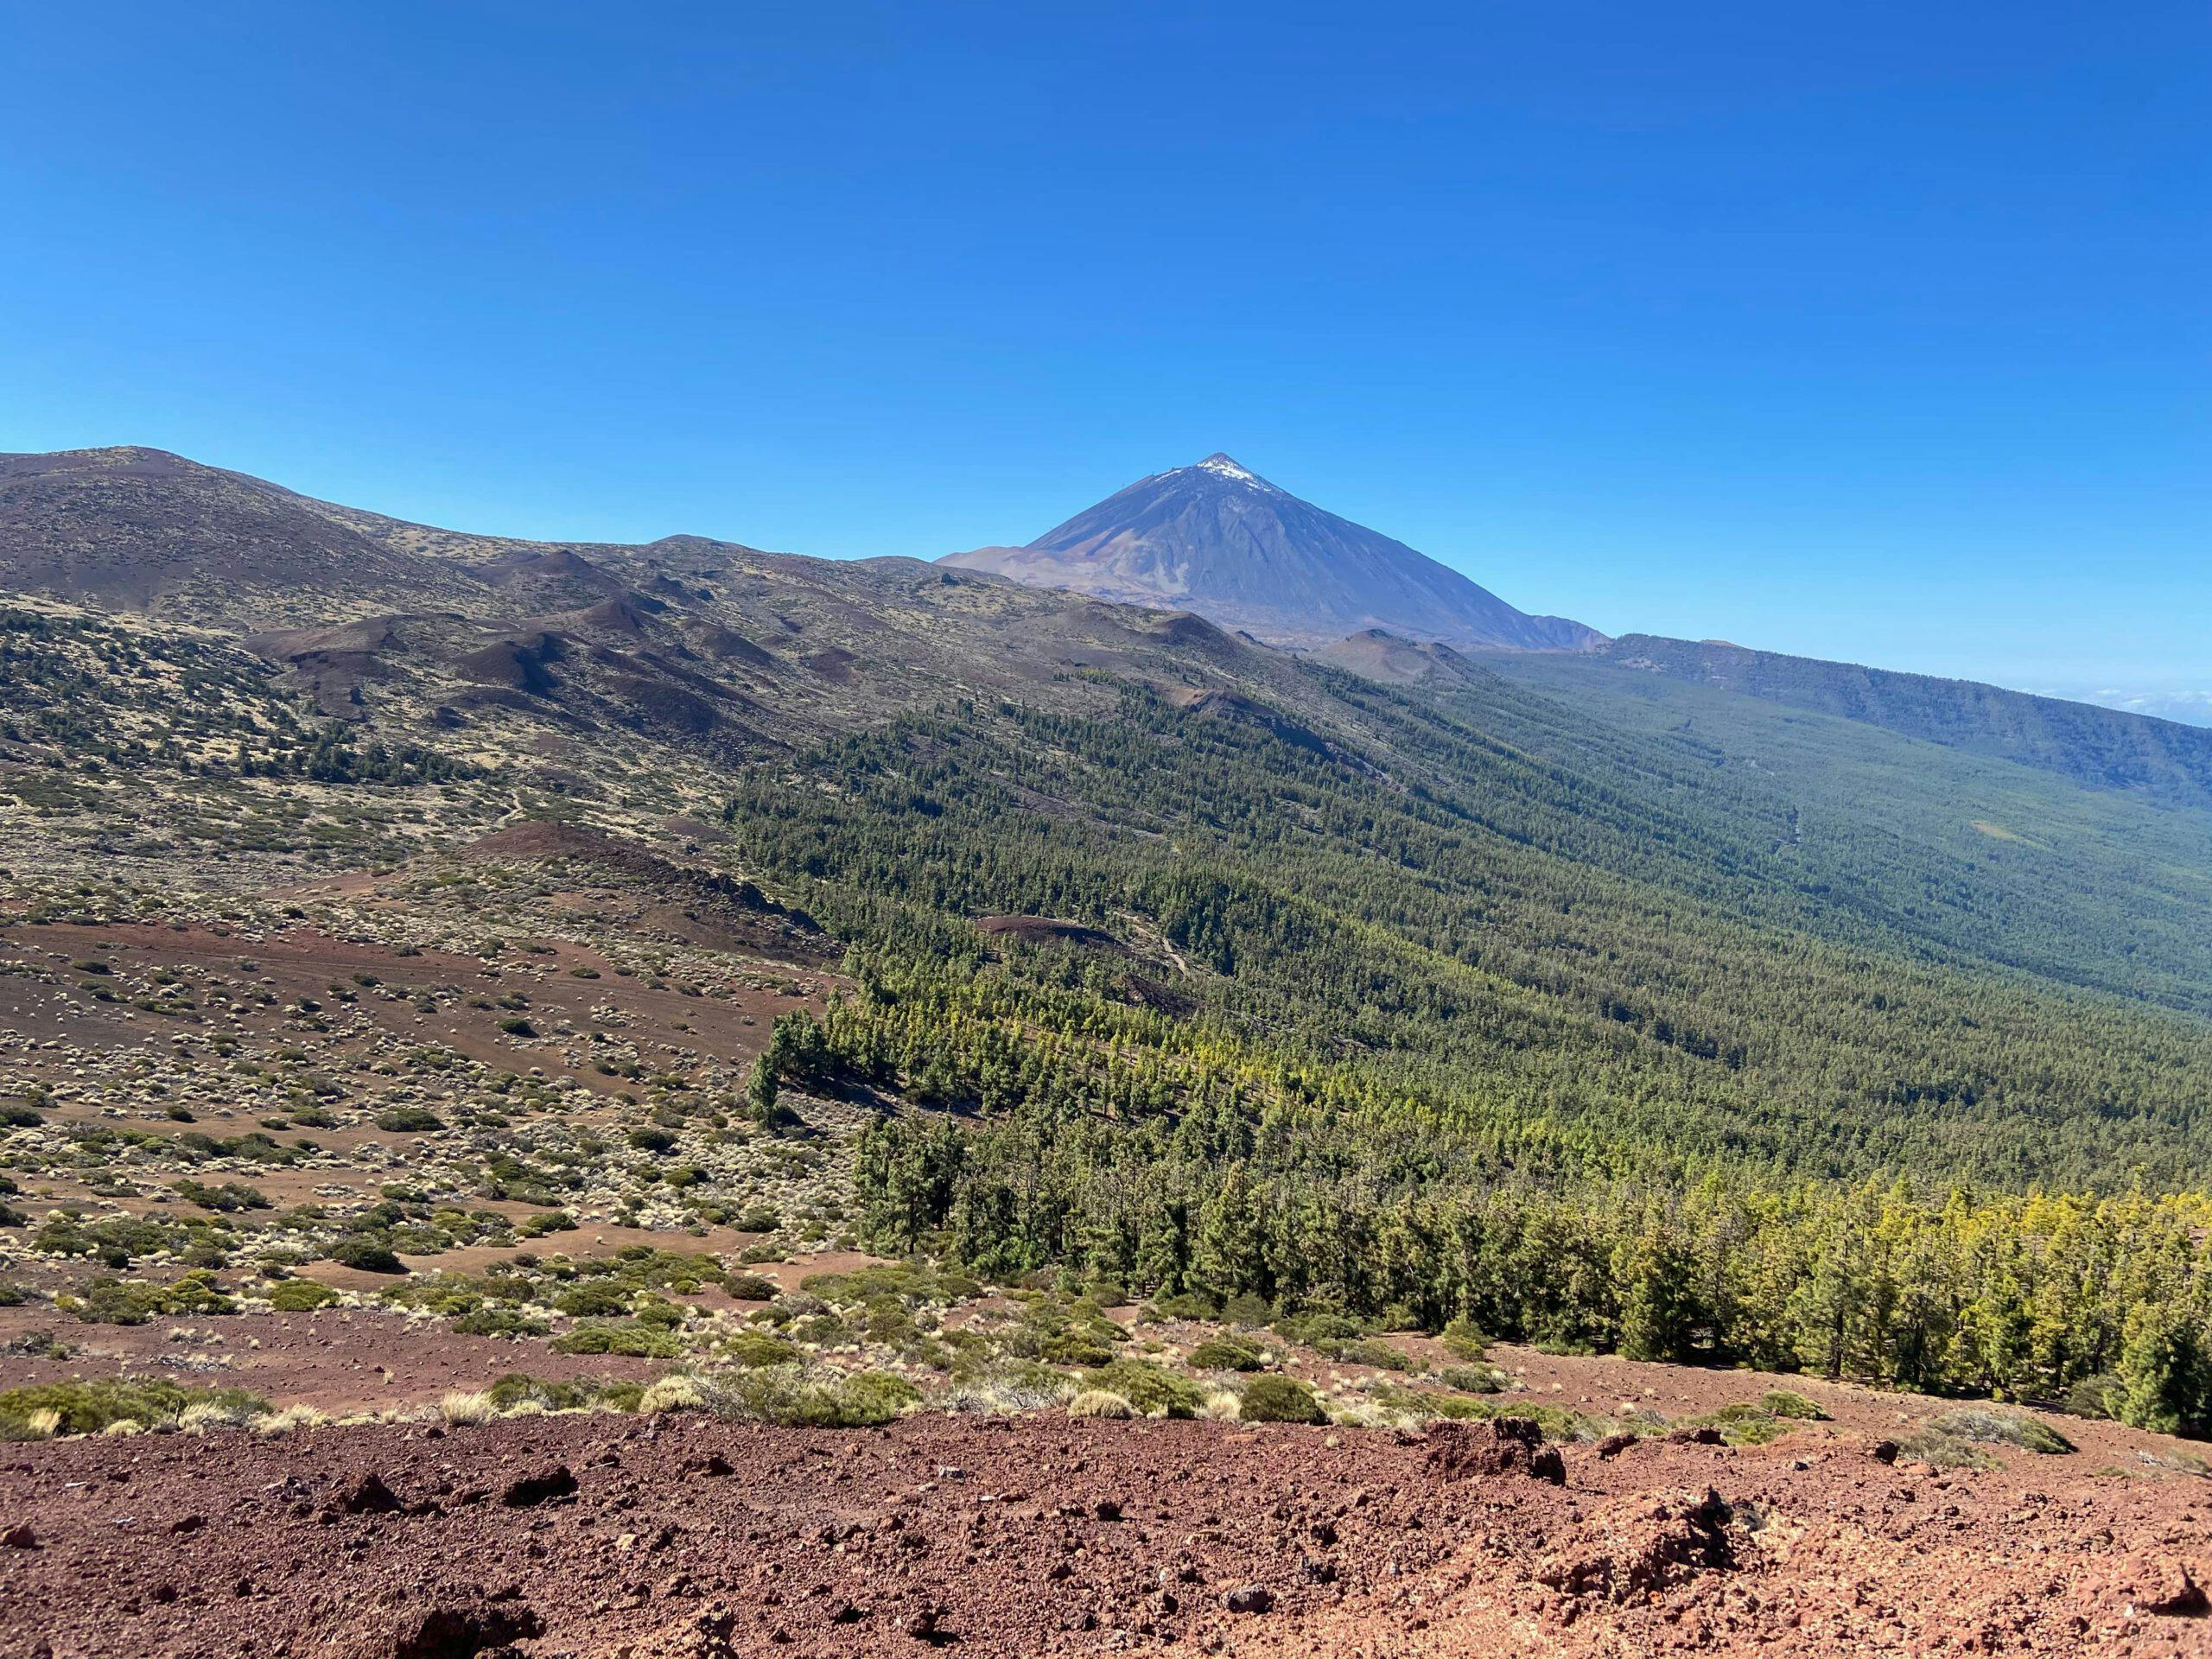
Montaña Limón – a volcano with a fantastic view
Montaña Limón and a neighbouring volcano are located above the Orotava valley. On this hike you can climb both peaks. And from there you can enjoy magnificent panoramic views. You can see the whole Orotava valley below you, the Teide and the observatory of Izaña on the other side. But before you can climb the peaks, you first have a long climb from the La Caldera park and rest area through the forests above Orotava.

View from Montaña Limón - the trail continues to the offshore peak
When you leave the wooded areas, you can really enjoy beautiful views the whole time. The ascent paths are well-maintained hiking trails. On the way down, you will sometimes have to walk along narrow paths. You walk along a large barranco, the name of which I can’t really tell you. In my apps it is called something else (Barranco de la Vera, Barranco de los Arcos (in the lower part) or Barranco de Pedro Gil). Perhaps someone knows the correct name? In the article, I have chosen the name Barranco de Pedro Gil.
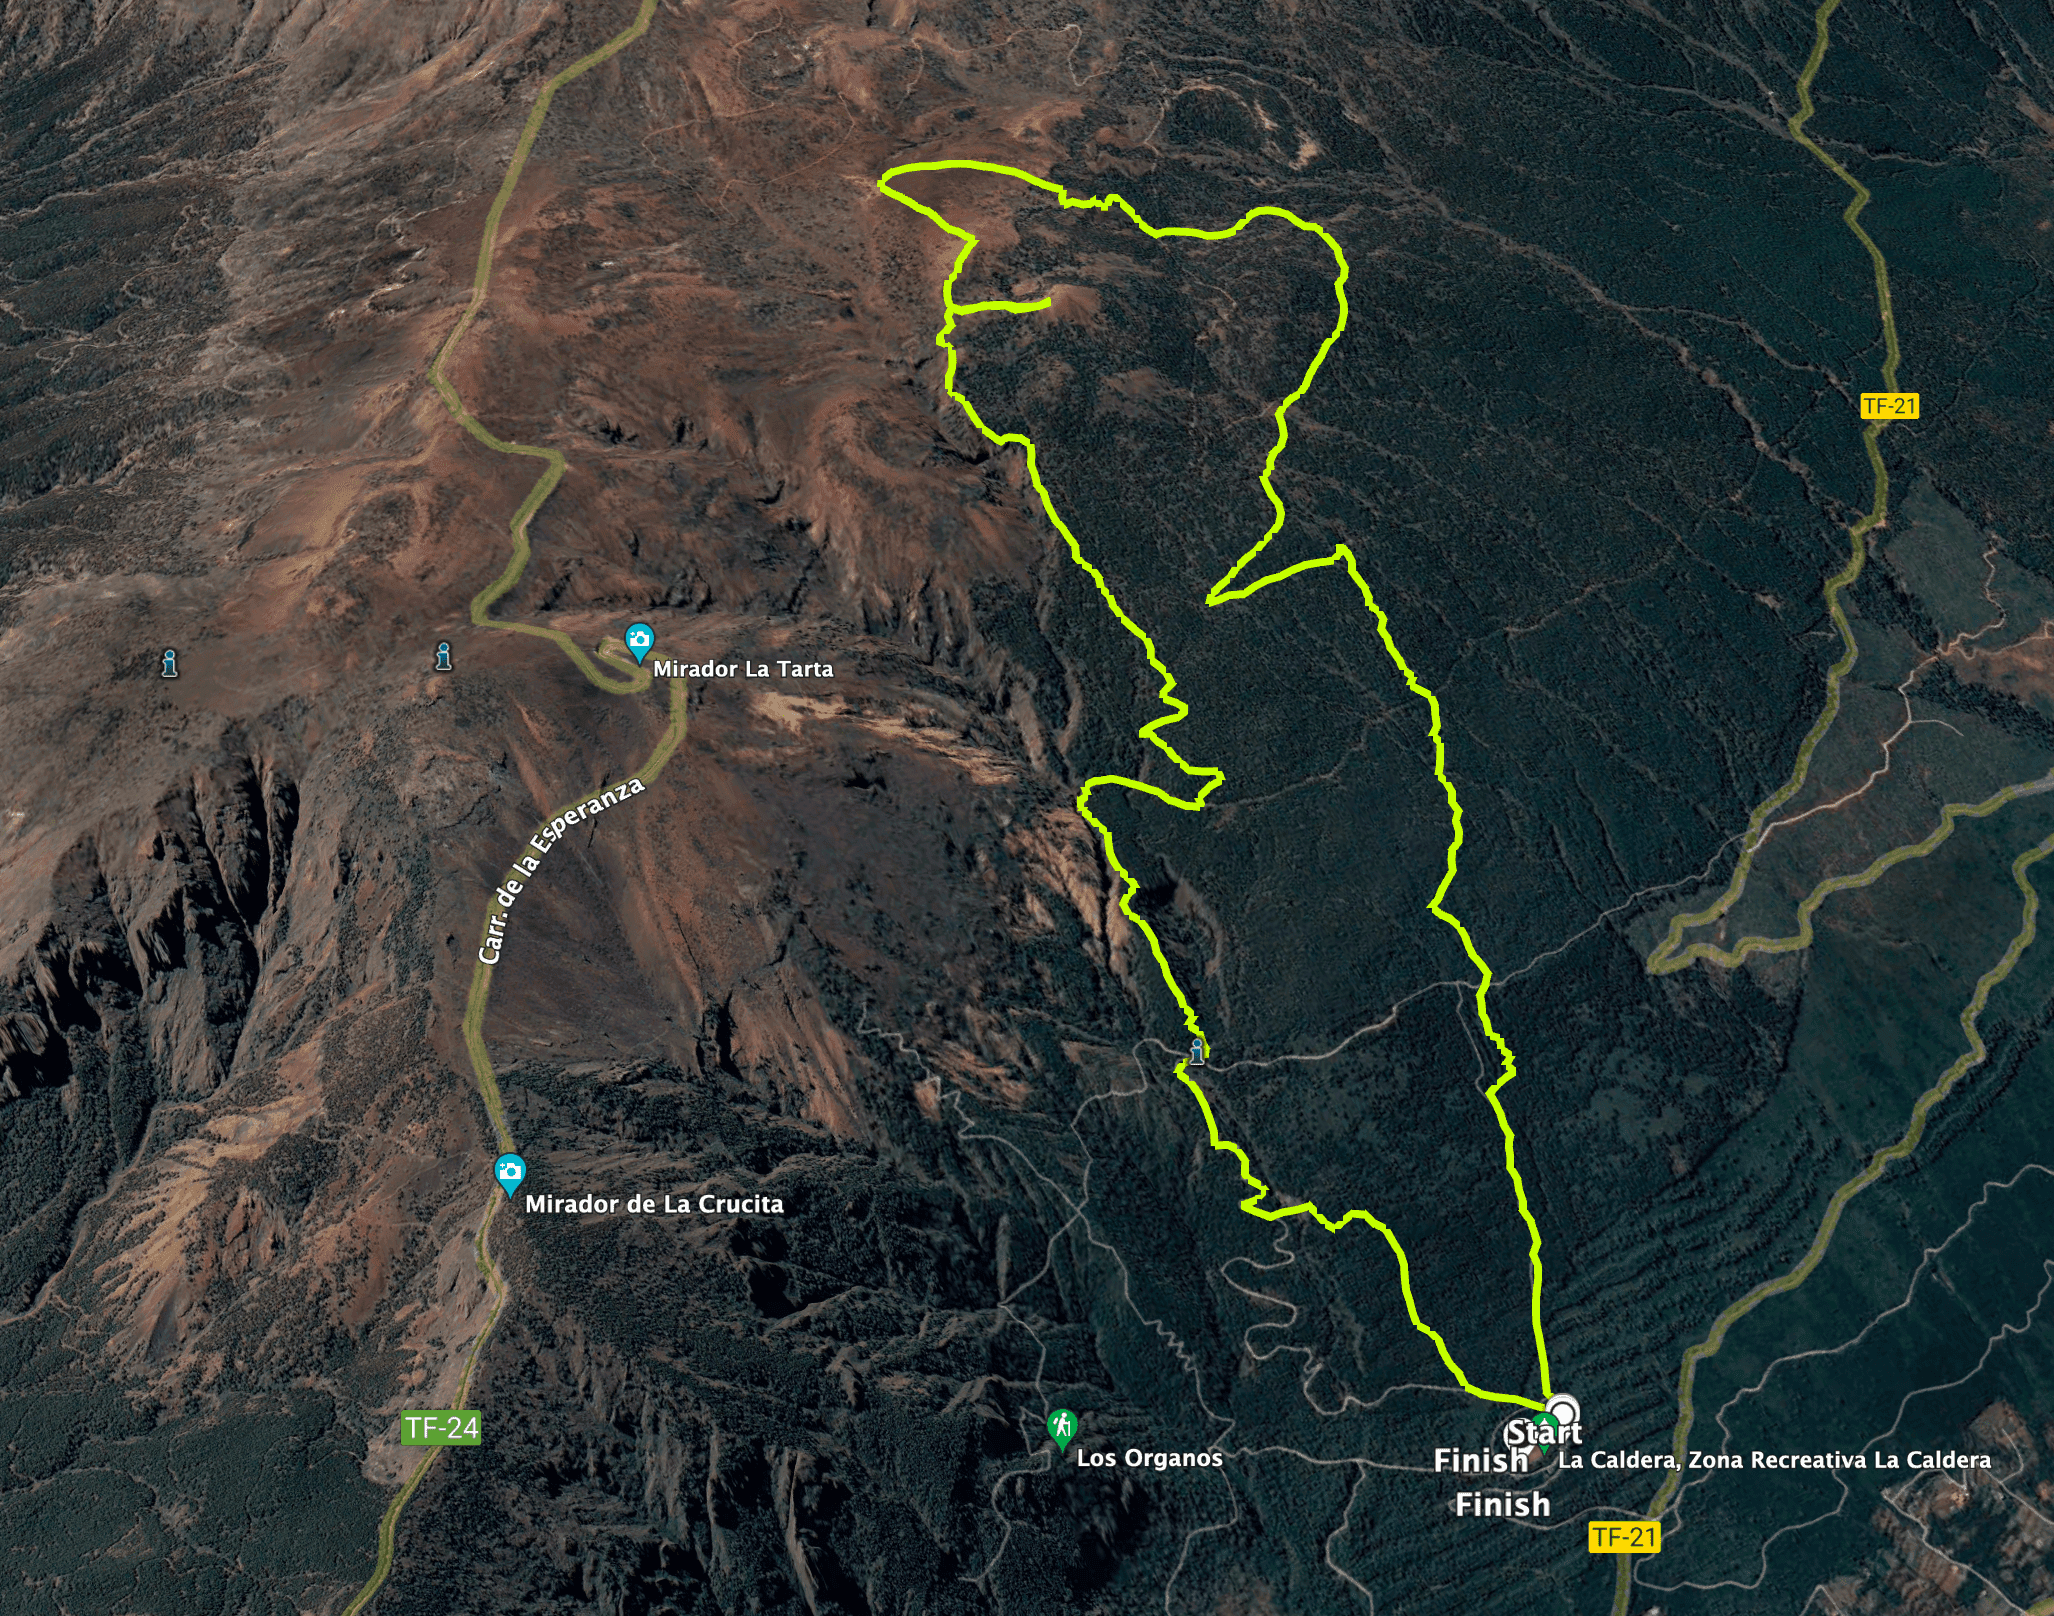
Montaña Limón Hike Track
General information about the circular hike Montaña Limón
Starting point and approach

La Caldera Picnic Area
The starting point for this hike is the La Caldera car park (zona recreativa) at an altitude of almost 1200 metres near the TF-21 (access road to the Teide through the Orotava valley).
Access by car
By car, take the TF-21 from the north in the direction of Teide. If you are coming via the Cañadas, take the TF-21 towards Orotava at El Portillo. Shortly after Aguamansa, you leave the road on a small spur road. The La Caldera car park and the Órganos high trail are already signposted here. You drive through the forest a little and finally arrive at the La Caldera parking and rest area. If you arrive early, there are plenty of parking spaces. Due to the popularity and the many hikes that start here, space can get a little tight later on.
Getting there by bus
The Titsa bus lines 345 and 346 stop as their terminus directly at the car park and thus at the starting point. The 345 comes from Puerto de la Cruz and the 346 from Orotava. You can get more information on the Titsa homepage. Article summary and large selection of GPS hiking tracks
Sign up for my newsletter now and get exclusive access to my collected GPS tracks as well as all the brief information about my articles.
Sign up nowTime
I don’t like to give general times for hiking tours, as the times are very individual. We needed 6 hours for this tour with an extensive rest at the summit.

Altitude profile of the Montaña Limón hike
Difference in altitude and distance
The difference in altitude is just under 1000 metres. The route is about 14 kilometres long. Alternatively, however, I also present shorter rounds with less altitude difference in the article.
Requirements
You need to be in good physical condition for this hike. Otherwise I would classify the difficulty ridge as „medium“. On the way there you walk on good tracks and hiking trails. From Montaña Limón onwards there are sometimes narrow paths, but no exposed sections. Finally, I offer you the rest of the descent on a good hiking trail and alternatively on the Barranco rim across the forest.
Refreshments
There are no restaurants, bars or shops on the entire hike. Therefore, take enough water and food with you if necessary.
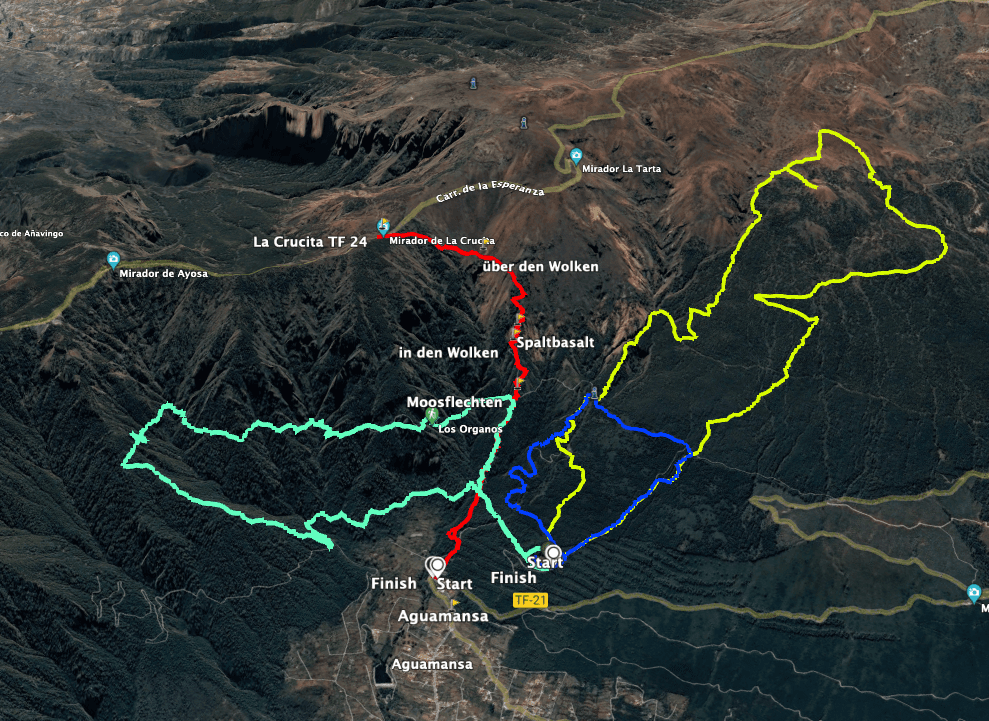
Track Montaña Limón (yellow), small loop (blue), Órganos high trail (green), Mirador de la Crucita (red)
Variants
This tour can be combined well with various other hikes and circular walks in the vicinity. I already mentioned the Órganos high trail above. The ascent tour from Aguamansa to La Crucita can be found here (in red on the track picture). If this tour is too long for you, there are two smaller alternative tours in the Orotava valley and to Montaña Limón. 
View of the Teide from the ascent path
Circular hike to Montaña Limón
Section from Caldera car park to Piste Chimiche and 1st variant
You start your hike at the parking and rest area La Caldera. At the end of the car park, follow the wide road straight ahead. After a while, a path branches off to the right. It is marked with a large wooden sign as Camino de Los Guanches. This path takes you uphill for a while in the forest. At an unclear point (2 possibilities) there is another sign „Sendero“, which you follow. After a steep climb, you will reach the Chimiche track.

Ascent Camino de Los Guanches
- 1.0
variant: If you only want to do a large forest circuit and the whole tour is too long for you, you can continue to the left on the piste here. You can walk gently up and down to the Choza de Chimoche. There, a path leads down. This is also the way back of the larger tour. You can walk on the narrow hiking trail or on the road. But eventually you will come back to a track that takes you around to the left to the La Caldera parking and rest area.
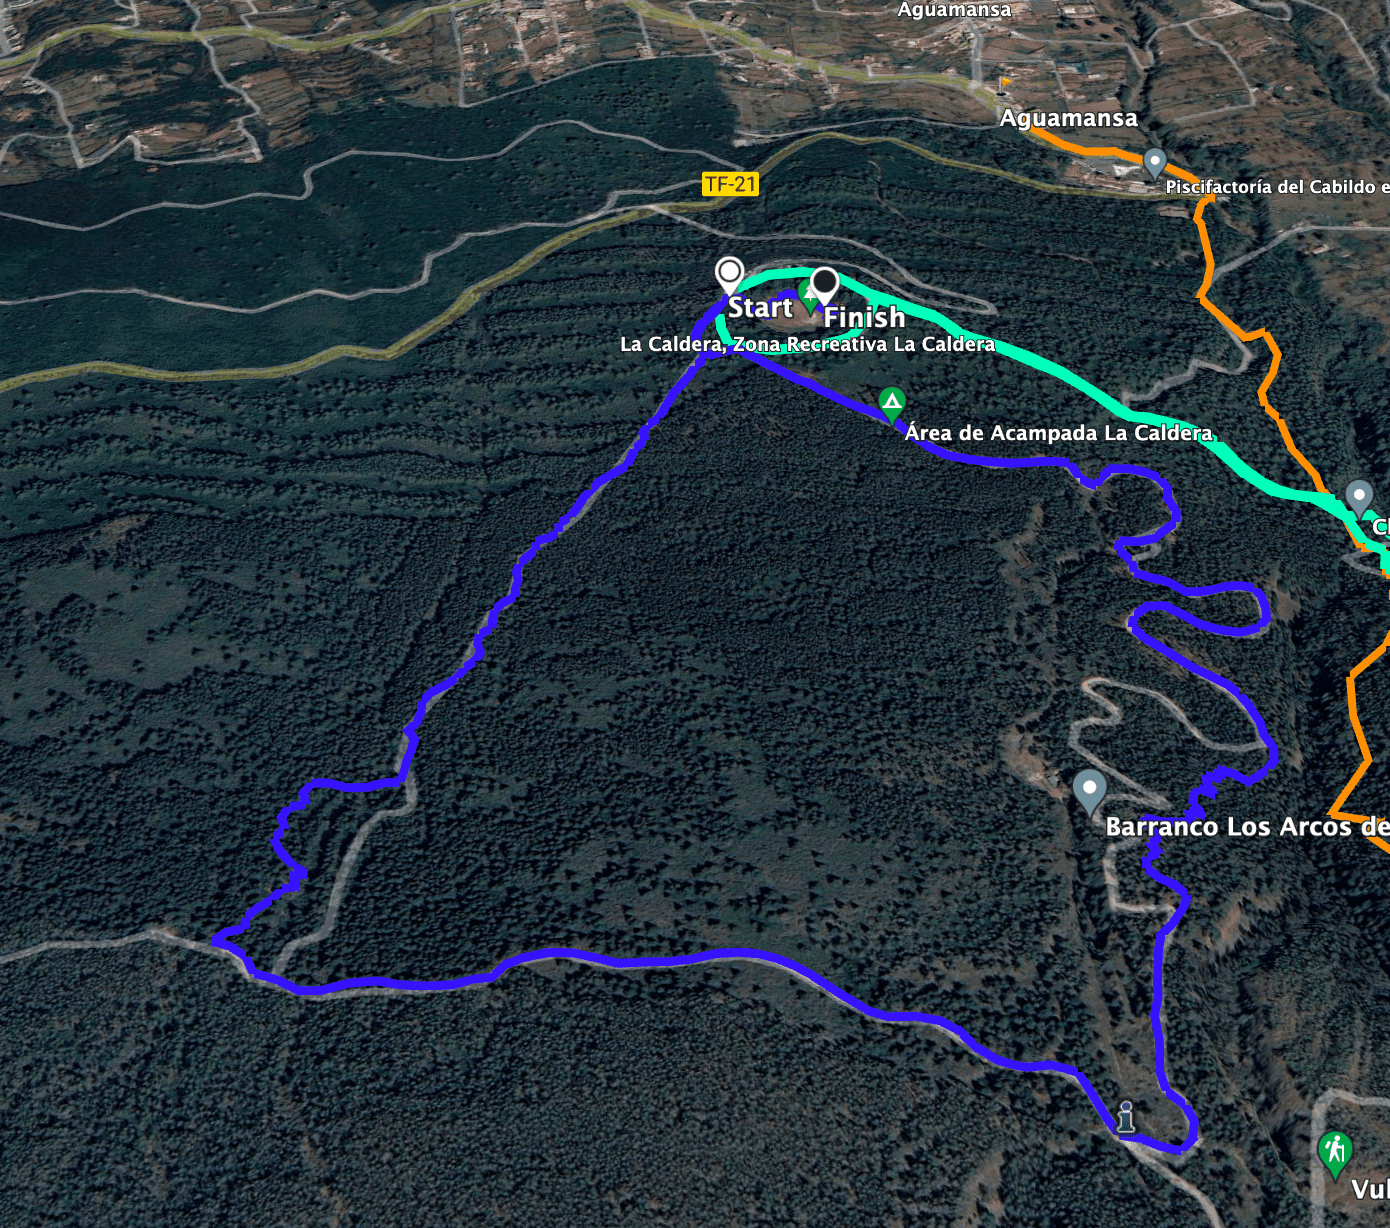
Track of the small forest round at La Caldera
Route section Piste Chimiche to T Hiking junction
For the big round trip, cross the Chimiche slope. The ascent path continues on the other side. It takes you further up steeply in the forest. You will then reach another track (Pista Arcos de Chimoche). If you want to extend this big loop, you can go around to the right on this track and then take the next ascent path to the left (variant 2). The trail rejoins this trail shortly before Montaña Limón. On the tour described here, you go straight over the track and continue up along the path.

Orotava Valley - Hiking trail below the Órganos rocks
Article summary and large selection of GPS hiking tracks
Sign up for my newsletter now and get exclusive access to my collected GPS tracks as well as all the brief information about my articles.
Sign up nowWhen the ascent path reaches the next dirt road, you continue for a short while on this dirt road to the left. At the next hairpin bend you will come to a hiking junction. After a short while you will meet the return path (variant 3: another possibility to reduce the loop). But to Montaña Limón, follow the road uphill to the right. At the next hairpin bend, you can leave the road and continue climbing on a narrower path. Finally, you will come to a kind of T-junction in the forest. This is where the trail of the larger loop (variant 2) arrives.

View of the Orotava valley from the Montaña Limón ascent trail
Section T-junction to Montaña Limón
You hike steeply uphill around to the left until you meet the road again. Cross this road. Afterwards, the trail climbs steeply through the last wooded areas in a few switchbacks. When you come out of the wooded areas onto a rocky landscape covered with bushes, your field of vision opens up and you can see up to Cumbre Dorsal. Montaña Limón is also visible above you on the left. The path then leads you along the foot of Montaña Limón for some time.

View from the ascent path to Montaña Limón
Then the ascent path begins, well marked with stones on the left. Once you have completed this, you will have climbed most of the metres and will be rewarded with truly magnificent panoramic views. You have a view of Cumbre Dorsal with Izaña, the Orotava valley and, in good weather, you can also see the neighbouring islands of La Gomera and La Palma. It’s worth taking a rest up here at 2106 metres altitude.
4. Variant
4. variant: If the hike is too difficult for you, but you want to climb Montaña Limón, you can also take the TF-24 to Izaña and park close by at the Mirador Corral del Niño. From there, a hiking trail leads more or less parallel to the TF-24 downhill. A small crossing takes you directly from this path to the ascent path to Montaña Limón. If you like it a little longer, follow the track further downhill and you will meet the hiking trail described for the main hike. You can then walk along the foot of Montaña Limón until you reach the ascent path.
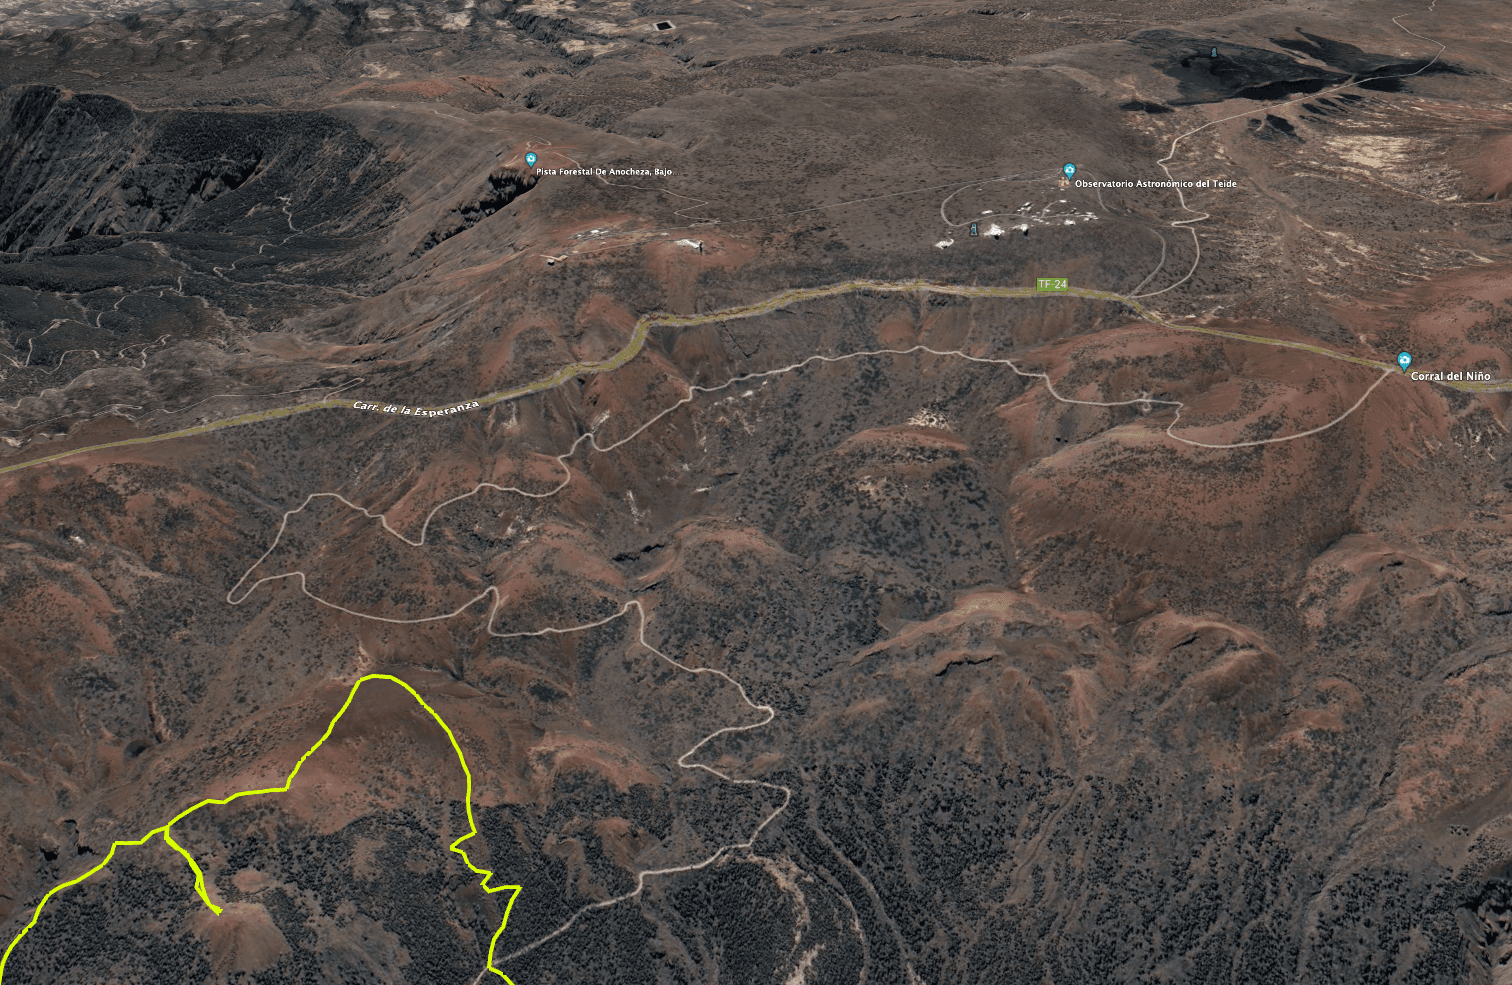
Short tour to Montaña Limón from TF-24 parking Corral de Niño
Section Montaña Limón to Pista Arcos de Chimoche
The big loop now continues from Montaña Limón to another volcanic cone in front of it. You hike down on a narrow path on the other slightly wooded side of Montaña Limón. From time to time the path is a little hard to find. Look out for cairns. From this path you can make a detour to the second peak. You can also enjoy beautiful views from here. When you return from this summit path, the path takes you further downhill.

View of the Izaña Observatory from Montaña Limón
You will reach the edge of the Barranco de Pedro Gil. Apart from the depth and vastness, the almost indescribable colours are particularly impressive. Therefore, it is nice that the further descent path leads directly along the edge of the Barranco. Again and again it is worth stopping to enjoy the fantastic views into the Barranco. Eventually, however, the path turns away from the Barranco and you walk further down in the forest. Finally, you will reach the Arcos de Chimoche track again.

Hikers at the edge of the barranco below Montaña Limón de Pedro Gil
Pista Arcos de Chimoche to La Caldera rest and parking area
There are two possible routes from here. The easy and also normal hiking trail leads straight down through the forest to the Pista Chimoche. This is also where the short hike of variant 1 goes. If you want to be a bit wilder, you can follow the track further to the right. It ends at the Barranco de Pedro Gill, which is also called Barranco de los Arcos at this point. Here you can take a look at the first classic abseil in the Barranco de los Arcos.

View into the Barranco Pedro de Gil ravine
Afterwards you can follow a small path downhill along the edge of the Barranco. You will come to a sharp edge in the forest. Follow it to the right and at the end downhill onto a ridge. From here, the descent is almost pathless over this ridge. In fact, this short passage is not recommended for everyone because of the tracklessness. But even here you come out at the Choza de Chimoche. Several hiking trails converge there. On the right, you will soon reach the Órganos high trail. Continue straight downhill on the track (blue) or on a narrow forest path (yellow) to the starting point of the hike, the La Caldera parking and rest area.

Hiker on the edge of the large Barranco Pedro de Gil
And finally
I hope you enjoyed this great tour, which is offered with numerous variations. You will certainly find the right tour to Montaña Limón for you. Take care and have fun on all your hikes,
Dagmar from SiebenInseln