Ventanas de Güímar – a spectacular and exciting hike
The hike Ventanas de Güímar is not for the faint hearted. Sure-footedness and a head for heights are necessary every minute. But if that doesn’t scare you off, this hike is indeed breathtaking and will always remain unforgettable.

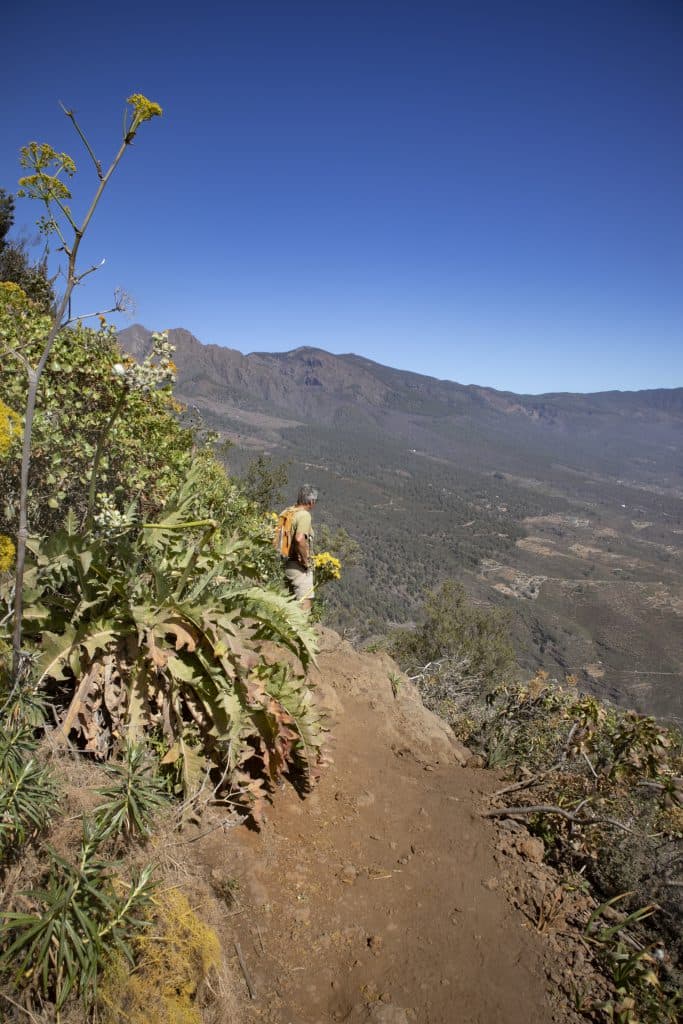
View of the access route and Gran Canaria
Map
The hike takes you along a canal through 8 (alternatively 10) tunnels, some of which have „windows“ (ventanas). This is what makes this hike so attractive, as you can enjoy fantastic views from these windows in the rocks.

hiking path along the chanel
Partly the hike is also called „Mille Ventanas“ (1000 windows). But don’t worry, according to my hiking friend Iain, who counted, there are only 93 windows. I admit, although I myself have been there three times, not to have counted. You walk over and beside covered water channels. And since the cover plates are partly destroyed, you often walk on and off the water channel at first. Then the tunnels partly follow with grandiose „window views“. In between, a narrow path leads always close to the abyss. Ventanas Güímar – actually a so-called black (difficult) route. 
View on the window to the rock walls
Ventanas de Güímar – remote and feasible in variations
Already the access to this hiking tour Ventanas de Güímar is not so easy. You can find the exact description under the information. In any case you need a vehicle. The closer you want to drive to the starting point, the more suitable it should be. If you do not have a vehicle, you can also take a taxi from Güímar. And if you want to come by bus, you will need about 1 hour extra walk from the bus stop to the start of the tour.

partly comfortable hiking trail through the tunnel
Then, when you are especially interested in the Ventanas de Güímar, you can do the hike by walking through all the tunnels and coming back the same way. I did this once when we only had one vehicle at the starting point. But it is nicer if you do not have to return and can return to the Ventanas de Güímar through a wild barranco and over a mountain ridge. Then you will need a second vehicle or a „pick-up“ at the end point of the hike.
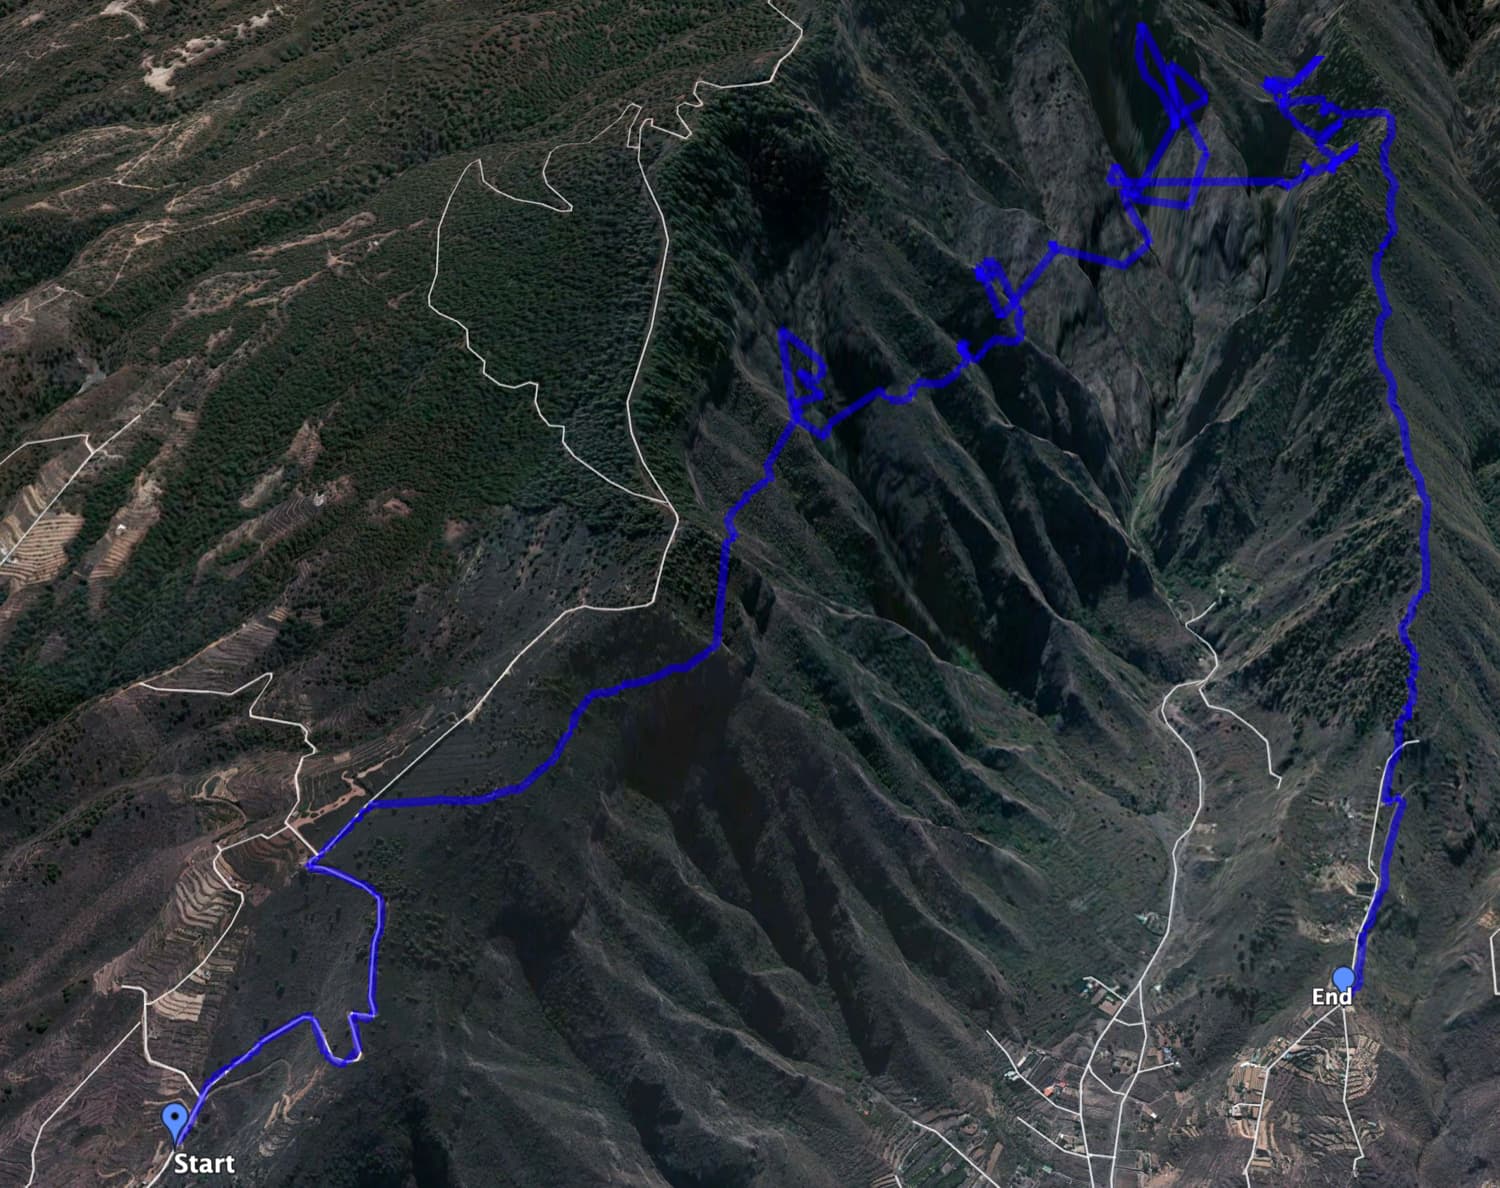
Track Windows of Güímar - "oneway"
General information about the Ventanas de Güímar circular walk

Access road Ventanas Güímar
Starting point and approach
The hike starts at the end of a small asphalt road (Pista de Anocheza) that branches off the TF-28, in Ladera Güímar. With off-road vehicles you can also drive a little further up the road.
Approach by car
Take the TF-1 motorway and exit at Güímar. Drive towards Güímar and then follow the TF-28 towards Fasnia. In front of you you will see a mountain range with antenna masts. About 6 kilometres past Güímar, a sharp right turn just before kilometre 30 turns right onto a small road. Follow this pista de Anocheza for about 2.5 kilometres up the mountain. The starting point of the hike are the radio masts. There you can park at the roadside. If you want to drive a little further, this is also possible. Then you will save some altitude meters.
For the end point of the hike a vehicle should be parked approximately at the coordinates (latitude 28°18’23.88 „N longitude 16°26’7.53 „W). The description is a bit complicated. You drive to Güímar, then turn onto the TF-28 towards Fasnia. After a short while you turn right onto a small road that takes you straight uphill (Calle Lomo Grillo Abajo). Later it is called Camino Lomo de la Cruz. This brings you to a small village. In the middle of the church square you turn right again onto a small road uphill. Follow this road as far as you can and want to go. Here you can park your car at the side of the road or in the dents. On this road you return after the walk through the Ventanas de Güímar.
Approach by bus
The Titsa bus lines 111, 120, 121 und 128 stop in Güímar. But if you choose this option, it will take you about an hour of walking uphill until you reach the starting point of the Ventanas de Güímar. There is no bus stop at the end point of this hiking tour. Therefore, if you arrive by bus, you should choose the variant with the same way there and back. Or you have to add another hour for the descent to Güímar.
Information about all bus connections can be found on the Titsa homepage. Article summary and large selection of GPS hiking tracks
Sign up for my newsletter now and get exclusive access to my collected GPS tracks as well as all the brief information about my articles.
Sign up nowTime
I do not like to give general time indications for hiking tours, as the times are very individual. We needed approximately 4,5 hours for the hike through and also for the hike with outward and return journey with detailed photo and rest breaks.

elevation profile ventanas de Güímar "one way"
Difference in altitude and length of the route
The ascent is different depending on the starting point. For the whole hike I needed almost 600 meters of altitude difference in the ascent and almost 900 meters in the descent. The distance is almost 10 kilometers long.
For the hike with return trip it was about 400 height meters in the ascent and descent (we had driven a little bit closer to the starting point by car). Therefore the distance was only just over 9 kilometers long.

elevation profile ventanas de Güímar (there and back)
With the same starting point, the length of the whole route or the outward and return trip is therefore identical.
However, the altitude profiles have a lot of jagged edges, because the GPS does not work properly on the steep mountain walls and in the tunnels. Therefore, also the data that I compared with some other GPS data are only to be considered as approximate values. On the elevation profile the route is shown with a length of 12 kilometers, which is theoretically possible.
Requirements ,Warning and equipment
A really difficult hike, which requires not only stamina but also sure-footedness and a head for heights. Sometimes you have to balance a little on the canal. Except in the tunnels, the hiking tour Ventanas de Güímar leads through the whole route close to the abyss.
Never do this hike in stormy or wet weather.
To cross the tunnels, bring a headlamp or a good flashlight. As the tunnels are sometimes a little low, it is also advisable to wear a helmet.
Refreshment
Restaurants, bars and shops can only be found in Güímar (about 6 kilometres from the starting point). Therefore, bring sufficient water and food if necessary.

Track Ventanas Güímar (there and back)
Variants
This tour can be done – as mentioned above – on the one hand with a return trip through the Ventanas de Güímar. Thus, you will see the worth seeing „windows“ and experience the actual spectacular way twice. Or you can continue after the hike through the Ventanas de Güímar and descend towards Güímar. In this case you will need a second car at the end point or a taxi.

Ventanas de Güímar
Hike Ventanas de Güímar
Section of the route Parking lot to covered first water channel
You start your hike at the Pista de Anocheza at about 900 meters altitude. In serpentines you continue to hike up the slope. Depending on where you have parked your car, you will now walk 200-300 meters up the slope. You will pass another big radio mast. Here a path turns off to the left. However, you follow the piste about 150 meters further straight ahead. Then you will see a small square on the right side with an information board indicating dangers. At the signpost a small path begins, which leads through the bushes.

Start of the tour - Ventanas Güímar
Follow this path. It brings you to a water channel on the slope side. From now on, water channels and water pipes will accompany you on the entire hike. Here, on the outside of the slope, you will have a fantastic view of the entire valley with Güímar spreading out before your feet. If the weather is good, you can also see the neighbouring island of Gran Canaria. But now you have to concentrate. The path starts on a covered water channel. Every now and then there are plates missing, so that you can balance or walk along the side of the channel.
Article summary and large selection of GPS hiking tracks
Sign up for my newsletter now and get exclusive access to my collected GPS tracks as well as all the brief information about my articles.
Sign up now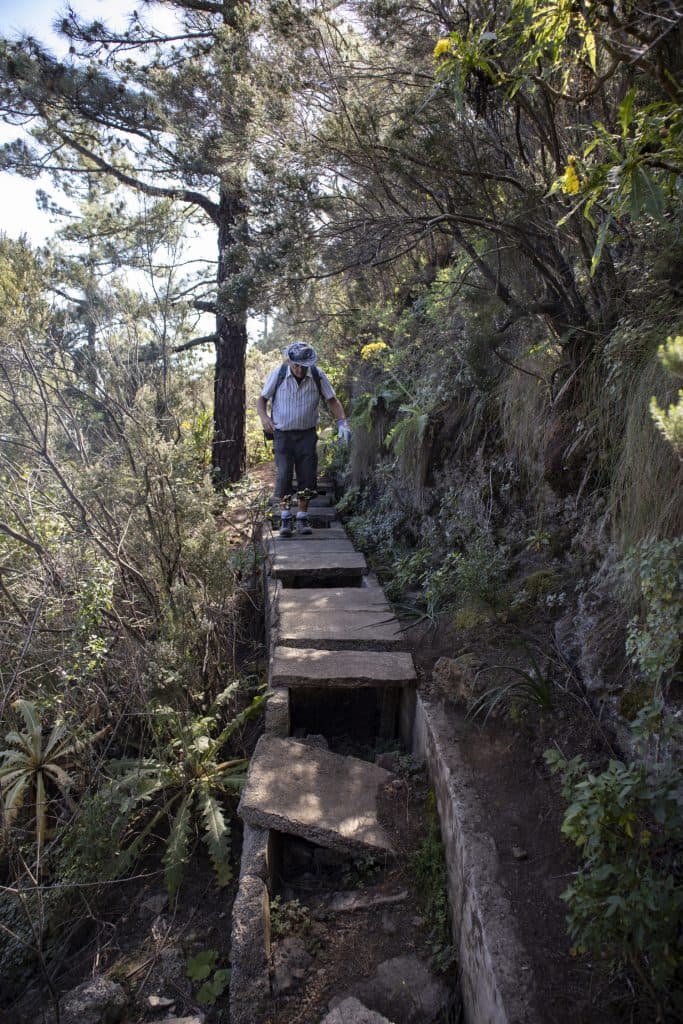
Hike over the covered (or partly not) channel
Route section first covered water channel until the end of the 3rd tunnel
The canal takes you into the steep face, Ladera de Güímar. Here the canal is overgrown with many flowers and bushes in many places, so that a constant ascent and descent of the canal is necessary. The path next to the canal is narrow and close to the precipice, but not dangerous if you are sure-footed and have a head for heights. The situation is different in wet and stormy weather. Then after about 15 minutes you come to a place where an excavator has crashed. I don’t know how long it has been there. When I walked the Ventanas de Güímar for the first time in January 2016, it was already there. Right behind the excavator the first tunnel begins.

crashed digger - entry into the first tunnel
The first tunnel is about 200 meters long and quite flat, so you have to walk bent over. Watch your head or wear a helmet. I always have my bike helmet with me. Then a section follows along the canal. Everything is quite overgrown and you go up and down on a narrow path. Pretty fast comes the 2nd tunnel, which is marked with a yellow 2 and which is 140 meters long. Then follows the 3rd tunnel with about 100 meters length. Now you are right on the hike Ventanas de Güímar, because this tunnel has the first windows from which you can admire the surrounding mountain walls and landscape.

Tunnel route
Section end of 3rd tunnel to Ventanas de Güímar
After the third tunnel, the narrow rock faces are so steep that no real GPS signal can be received. You cross the Barranco Chamoco at the far end. As there is rocky ground here and it goes downhill at an angle, you have to be careful, especially if it is damp. Afterwards you enter the approx. 150 meters long 4th tunnel, which has several windows, so that you can not only walk comfortably but also enjoy beautiful views. After the 4th tunnel the path runs outside for a longer time.
Hiker on the way to the first tunnel
You always walk along the abyss and the canal, circling several rocky outcrops and cuts. Finally you will arrive at an impressive part of this tour. You will walk around and cross the Barranco de Badajoz (Chigarafa de Arriba) with its huge rocks. Then you enter the approx. 120 meters long 5th tunnel with some windows. Enjoy the wonderful view. Soon follows a 150 meter long tunnel without windows. Then in the 200 meter long tunnel 7 there are no windows at first, but in the further course there are some windows. From there you can already see the Ventanas de Güímar on the opposite side of the rock.

Hiking trail along the windows
Section Ventanas de Güímar to water channel (Canal de Araya)
Now you actually get to the most impressive part of the tour, which also gives this hike its name, the Ventanas de Güímar. You cross the rock massif of the Fuga de Los Cuatro Reales with a wonderful view from the many windows. Before you reach the last window, the path forks. To the left you can continue in tunnels 9 and 10 without windows. But on this tour we keep to the right. After a short time you come out of the tunnel and find yourself in the Barranco de Bajadoz. From now on the way is hard to find from time to time. But there are water pipes everywhere, which are good for orientation. You just follow the water pipes Barranco upwards.

a window in the tunnel wall
The small path leads through many bushes over a small rock plateau and then again along a rock wall. Finally the path forks. The pipes and a path continue straight ahead. But a steep path branches off sharply uphill to the right. It takes you on a very narrow and often very steep path with a little bit of clambering up the ridge after about 15 minutes. Up here you have again a nice view and you are at another covered water channel (Canal de Araya).

"1000 ventanas" - it's really only supposed to be 93
Route section mountain ridge with Canal de Araya to parking lot car (end point of your hike)
Now you follow a narrow path that quickly leads you to the top of the ridge. From there the path takes you downhill partly on the left and partly on the right side of the slope. It goes downhill on partly quite steep narrow paths through bushes. In between you still have beautiful views of both sides of the valley. You can’t get lost, as the path always goes left or right along the canal, along canal pipes or other buildings through which the canal runs.

Way back through much green nature
Finally, the path leads into a wider driveway, which you follow to the right and further downhill. After a short time the path turns into a real small street near a building. This is the street where you parked your car. Depending on where this has happened, you will be at your car in no time.

a covered channel on the mountain ridge
And finally
I hope you enjoyed this impressive hike. The Ventanas de Güímar are really a very special tour. And I am especially happy that I have finally managed to prepare this unique tour here as an article for Seven Islands. I wish you a lot of fun on this exposed „window walk“,
Dagmar von SiebenInseln