Achtung - die Wanderung führt über ein Gebiet, das teilweise wegen militärischer Übungen gesperrt ist. Daher bitte vor der Wanderung beim Teide Nationalpark (Verwaltung) erkundigen, ob die Wanderung möglich ist.
Some ways to experience Siete Cañadas
The Siete Cañadas hike described here takes you along the Cumbre of Tenerife’s caldera from the Parador Nacional to El Portillo. An impressive up-and-down hike with magnificent views of the entire caldera and Mount Teide on your left. To the right, you look far down on the east coast of Tenerife with the Atlantic Ocean.
Map

View from the Siete Cañadas hiking trail across to Teide
You can walk this path in two variants. The easy version simply leads you along a wide road at the foot of the caldera walls. This variant can therefore be considered more of a long walk, with only a few ascents totalling 200 metres in altitude over about 22 kilometres. The other variant, which I describe here in detail, takes you along the high trail along the Cumbre.

View of the Guajara from the hiking trail on the Cumbre
Challenging hike along the Cumbre
The Siete Cañadas trail over the Cumbre is also about 20 kilometres long and even 24 kilometres to El Portillo. Here, however, you have to cope with over 600 metres of altitude difference in sometimes quite steep ascents. Of course, you can also extend the hike over the Cumbre and additionally walk over the Guajara. 
S-8 Hiking trail over the Cumbre towards El Portillo
I will present you with various options below in the section on variants. It is important that you organise your arrival and departure well for this hike, as only a few buses go over the Cañadas. The cheapest way is probably to take two cars and park one at the starting point and one at the end. But even if the organisation is a bit complicated, it is worth it for this really impressive hike.
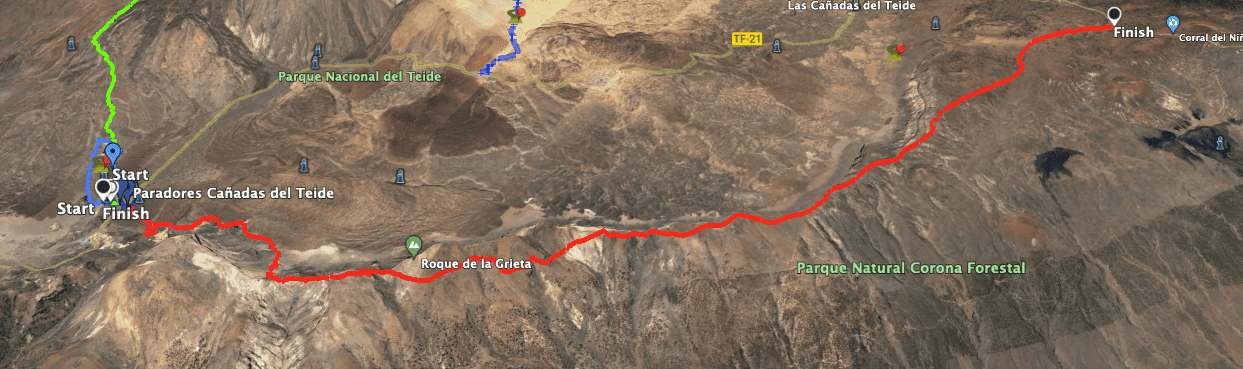
Siete Cañadas Hike Track
General information about the Siete Cañadas hike
Starting point and approach
The starting point is the car park in front of the Parador Nacional de las Cañadas (2151 metres altitude). If everything is full there, you can also park on the opposite side in the small car park at the Mirador de la Ruleta.

Starting point of the hike Siete Cañadas - Parador Naciona
Arrival by car
You can drive to Teide National Park on the access roads from all sides of the island. The Parador Nacional de la Cañadas and the Mirador de la Ruleta as well as the Roques de García are signposted. The car parks are on the TF-21. Coordinates: 28.224095, -16.626830.
Arrival by bus
The Titsa bus lines number 342 and 348 stop at the Parador and in El Portillo. You can find the exact timetables on the Titsa homepage. If you want to take the bus, plan your hike carefully as there are very few buses on this route. Plan enough time for the hike so that you don’t end up without a bus connection. Time
I don’t like to give general times for hiking tours, as the times are very individual. We needed a little over 6 hours for the entire route with a few long breaks for the group.
Article summary and large selection of GPS hiking tracks
Sign up for my newsletter now and get exclusive access to my collected GPS tracks as well as all the brief information about my articles.
Sign up now
Elevation profile of the Siete Cañadas hike
Altitude difference and route length
The difference in altitude is about 630 metres and the route is about 20 kilometres long.
Requirement
On the entire loop you walk on hiking and driving trails. However, due to the hike at altitude and the length of the route, you should be in good physical condition.
Refreshment stops
There are restaurants only at the starting point, the Parador Nacional de la Cañadas, and near El Portillo at the end point. Therefore, take enough water and, if necessary, food with you on the way.
Variants
The Siete Cañadas route between the Parador Nacional and El Portillo can also be done on the road at the foot of the caldera slopes as an alternative to the hike at altitude described here, in which case you will only have to cope with minor ascents and descents over the entire route of 22 kilometres, spread over 200-300 metres in altitude.
If you want to extend the walk on the caldera, you can also include the Guajara or parts of the Sombrero de Chasna hike. Furthermore, at El Portillo there is the possibility of doing a loop around Montaña Arenas Negras or the volcano Alto de Guamaso. The small circular hike through the caldera is also on the way. But since the route is already long enough at about 20 kilometres, the need for possible extensions will probably be limited. Note
From time to time, the hiking trail at the Degollada de Abreo is closed. This is a military training area. It is therefore essential to ask at the National Park Visitor Centre before the hike whether it is possible to cross the military area.
View from the Siete Cañadas hiking trail across to Teide
Hike Siete Cañadas
Route section Parador Nacional to shortcut small gorge
The hike begins directly at the Parador Nacional de la Cañadas. First, follow the small path that starts just behind the car park. This is the Sendero No. 4 hiking route, which runs in an easterly direction on a slight slope towards the Guajara. You are at an altitude of 2150 metres. After about a quarter of an hour’s hike, you will reach the wide road, also known as Siete Cañadas del Teide. Follow it around to the left. If you don’t leave it and keep following it, you will reach El Portillo after about 21 kilometres. 
Road Siete Cañadas with Parador and Teide
This is the alternative route mentioned above. For the high-altitude hike, you also follow this road, which takes you up a hill in several large serpentines. Then you hike straight ahead for a while and pass the first large impressive rocks of the caldera walls (Cañada del Capricho). After a short while, the road makes a big loop. You can shorten the path by taking a path uphill to the right. After a short hike uphill through a small gorge, this path brings you back to the road.

Impressive rocks along the path of the Siete Cañadas - Cañada del Capricho hiking trail
Route section shortcut small ravine to Montaña Pasajirón ascent trail
Article summary and large selection of GPS hiking tracks
Sign up for my newsletter now and get exclusive access to my collected GPS tracks as well as all the brief information about my articles.
Sign up nowYou continue straight ahead for quite a while. Then the Sanatorio trail (Sendero 16), which I described under the title Small Circular Hike through the Caldera, branches off to the left. A short time later, the path (Sendero 5) branches off uphill to the right and takes you up to Cumbre. This is followed by an ascent with a cross-cutting path that finally takes you to the Degollada between the Guajara and Montaña Pasajirón (Morra del Río). 
View from the Degollada in front of the Guajara to the Teide
From up here you can already enjoy the first beautiful views of the wide east coast of Tenerife on your right and the caldera and the Teide on your left. For a while you hike on the Degollada on the hiking trail S-8 in the direction of El Portillo, only slightly uphill. Then the path descends again and climbs steeply on a ridge path to Montaña Pasajirón (Morra del Río). This is the steepest ascent on this hike over the Cumbre.
View of the Degollada in front of the Guajara from the ascent path to Montaña Pasajirón
Route section ascent trail Montaña Pasajirón (Morra del Río) to Montaña de la Grieta
Once you have completed this ascent and climbed Montaña Pasajirón (Morra del Río), you will be at 2,529 metres of altitude. This is the highest point of the hike. From here, the trail more or less descends towards El Portillo, even though you can expect small climbs in between. You hike over the crest of Montaña Pasajirón (Morra del Río) and descend on the other side along a small path. As you can see from the track, we found the path only after some searching.

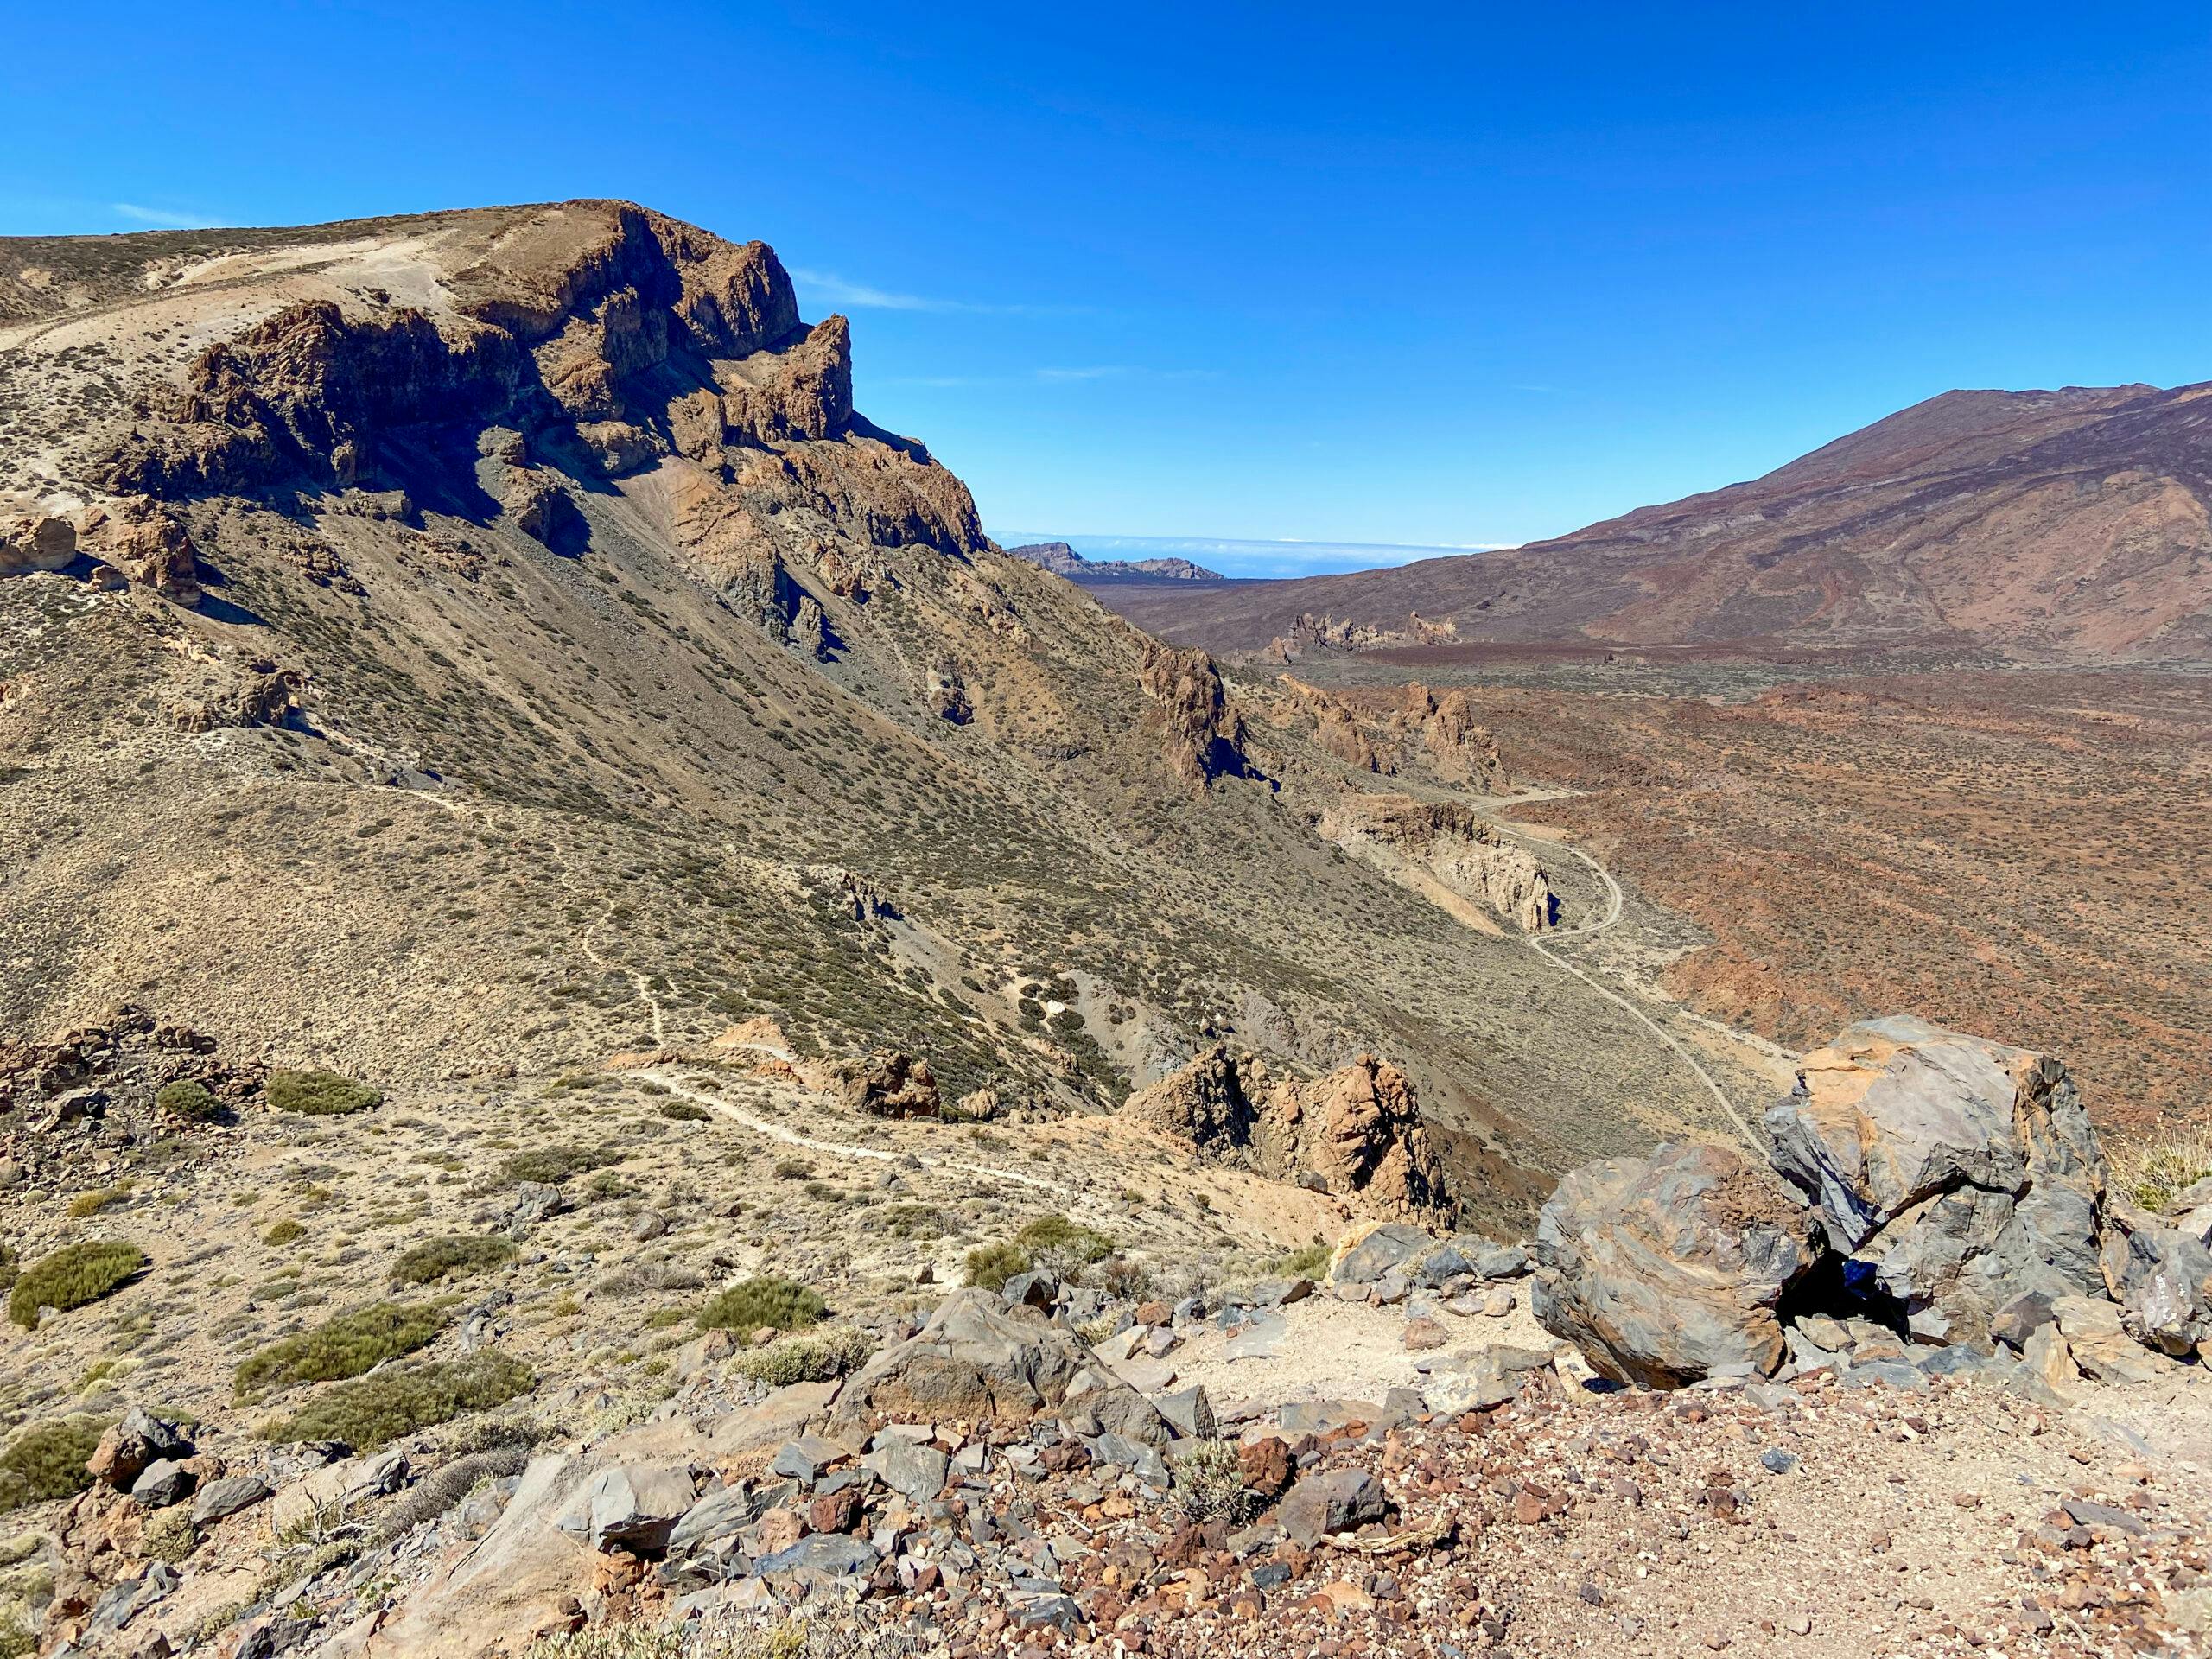
Hiking trail on the Cumbre - Montaña de la Grieta in the background
Just keep going towards the edge of the cliff. There the path is clearly visible. You walk through the next saddle before the Montaña de la Grieta. Its rock is as high as 2,576 metres. But you don’t have to climb to the summit. The hiking trail leads you to the back of the mighty rock. Afterwards, it runs behind and far below the rock. At the end of the rock, the trail turns further east away from the Cumbre.

Hiking trail Siete Cañadas behind the Cumbre - in the background Montaña de la Grieta
Route section ascent trail Montaña de la Grieta to Llano de los Infantes
Now the trail runs for a very long time far below the Cumbre. On a mostly wide road, you hike gently up and down, always parallel to the Cumbre. Finally, the path turns more towards the Cumbre again. You walk over a large area dominated by sandstone and light-coloured soil. The path brings you back to the Cumbre with magnificent views of the caldera and the Teide.

View from the Cumbre down to the east coast - here under the clouds
Here you climb uphill for a while, then hike over a small height. The path is clearly visible here and takes you further and further along the Cumbre. At one point, it turns a little further away from the Cumbre to avoid the large rock Morro Negro. The path then leads you back to the Cumbre. Finally, the trail turns away from the Cumbre and takes you along a road to Llano de Los Infantes.

Women hikers on the high trail on the Cumbre
Section Llano de los Infantes to El Portillo
Military exercises are often held on this road and in this area. It is then considered a restricted military area that you are not allowed to cross. It is therefore essential to check with the National Park Centre before planning this hike. Montaña Abreu (2405 metres) is on your right. Eventually you will reach the TF-24 road. From here you can take the road to the left to El Portillo or you can be picked up.

Area closed from time to time due to military exercises
If you want to hike all the way to El Portillo, follow the trail S-37 downhill to the left, which I described in the hike Montaña de las Arenas Negras. It branches off from the trail a few hundred metres before the road. However, the start is not so easy to find. It is marked with cairns and takes you through a small valley to a hill. From there, it continues high above the TF-24 and parallel to the road. Finally, this narrow trail joins the Arenas Negras S-2 trail, which takes you around to the right and downhill to El Portillo. 
View of the caldera and Teide from the high trail
And finally
I hope you enjoyed this rather long hike across the Cumbre of Tenerife. If you are fit enough, you will enjoy this wonderful hike with its great views. Otherwise, you could perhaps do it in sections from the Parador or El Portillo. I hope you enjoy your hikes,
Dagmar from Siebeninseln