A small hiking tour in the Teno mountains for beginners
Today I would like to present a really easy hike in the Teno mountains for all beginners or also for those who prefer a small hike. Again and again I’m asked that people like to read my hikes, but unfortunately they can’t or still can’t „follow“ them, because they might be a bit too demanding for them at the moment.
View from the hight to the Santiago Valley
Map
„I love hiking and am a beginner“. „I really like your tours, but I can never do so many meters of altitude difference. That’s the tenor or something like that. That’s why today it’s really a small hike over a few meters of altitude on wide and clearly marked hiking trails. Actually a hike for beginners, beginners and for relaxation of course also for everyone.
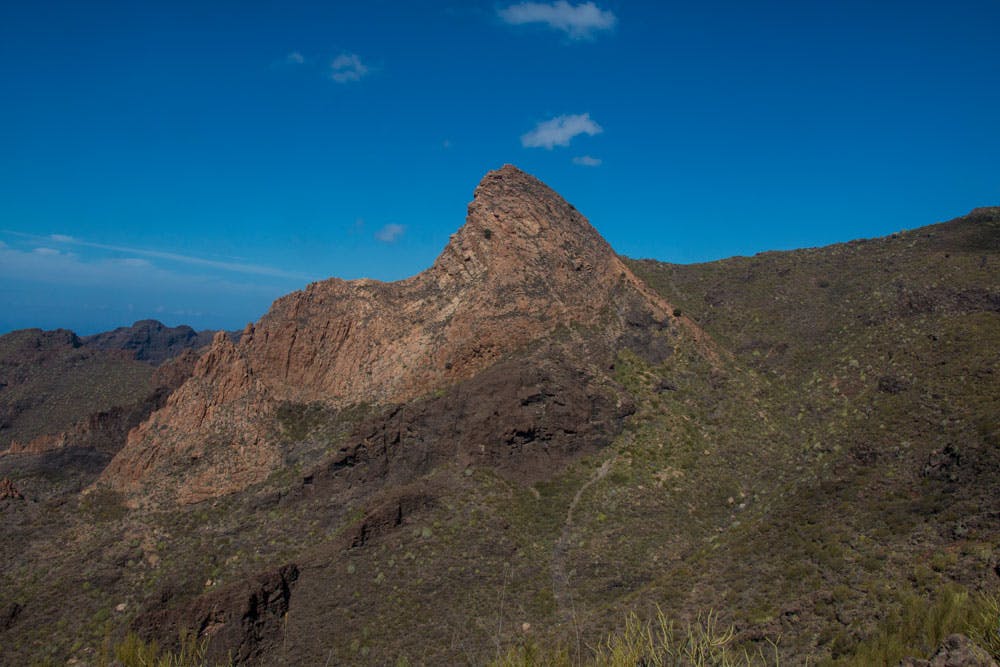
But there is also more: Risco Blanco and Lomo del Cabezón in the Teno
And if you think that you are underchallenged with such a small round, I will be happy to provide you with an extension. Those who want more can also visit the impressive white volcanic rock Risco Blanco. And if that’s not enough, it continues over a wild rock plateau in direction to Lomo del Cabezón to the abort edge at the Atlantic Ocean.
Panorama view from the plateau direction Risco Blanco
The summit of Risco Blanco is 924 metres high. The normal hiking trail ends at the foot of the white volcanic cone. With a little mountaineering experience you can start on a narrow path and climb up to the summit. To the right of the saddle in front of the Risco Blanco, a narrow path leads further downhill. Those who follow it can climb after some time on a beautiful rock plateau or also hike further direction Lomo del Cabezón. From the rock plateau, there is a fantastic view to the surrounding mountains and gorges. Here you will find the description.
view from Los Quemados into the Barranco Seco
Hiking in the „old part“ of Tenerife: the Teno Mountains
Before I come to the actual hike, I would like to start today to tell a little bit about the Teno mountains on Tenerife. Since I live right next to the Teno Mountains and can walk from home, the Teno Mountains are one of the regions I know best in Tenerife. I think I already know every nook and cranny here and have wandered everywhere. But then what a surprise. From time to time I suddenly find a way right in front of my front door that I have not yet discovered. Exciting – and of course the new one is tried out immediately.
Rugged landscape in front of the Risco Blanco
The Teno mountains, which are located in the extreme northwest of the island Tenerife, belong to the older mountains of the island like the Anaga mountains in the northeast of the island. In the Teno mountains, there are countless tours for hikers to discover. The proximity of the up to 600 meters high steep coast between Los Gigantes and the northwest tip, Punta Teno, is impressive. The Teno mountains are always broken through by the many deeply incised Barrancos. Of these, of course, is the most famous gorge, the Barranco of Masca.
Agaves on the hiking trail
Teno mountains: cloud forests, palm groves and deep Barrancos
The landscape in the Teno Mountains is very varied. Besides the Barrancos and the mountain ridges, it is characterized by cloud forests and gentle green valleys, which alternate with barren rocky areas. The highest mountain in the Teno Mountains is the Great Gala with 1347 metres of altitude difference. Right next to it and on a small path to climb, the Pico Verde or also called Small Gala with its 1318 meters of altitude.
Cactuses with figs
Pine forests can be found in the southern Teno mountains around the Great Gala. But otherwise less. But on the slopes of the northeast side the impressive cloud forests. The valley of Masca or also the Palmar valley appear green and fertile and have beside different cultivation areas also many palm groves to offer. By the way, the Teno mountains are rather characterized by a rough and barren rock and volcanic landscape.
Track - Teno mountains - Tamaimo - El Molledo
General information Teno mountains hike
Starting point
The hike can be easily started from the main road in Tamaimo or at the church in Tamaimo.
Arrival by car
You can reach Tamaimo by car from the north on the TF 82 in the direction of Santiago del Teide. From the north and south you can also take the TF 1 motorway and exit at Chio. Then take the TF 82 to Tamaimo. From the south towards Los Gigantes you take the TF 454. On the main road Carretera Puerto there are plenty of parking spaces at the side of the road.
Teno starting point at Tamaimo
Arrival by bus
TheTitsa bus lines 325 (Puerto de la Cruz-Los Gigantes), 460 (Icod de los Vinos-Costa Adeje), 462 (Guía de Isora-Los Gigantes) stop in Tamaimo. More information on the Titsa Homepage.
View on Tamaimo with treshing circle in the Barranco Santiago
Hiking time
This is a small hike that can be done in 2 hours without hurry. However, breaks are not yet included.
Article summary and large selection of GPS hiking tracks
Sign up for my newsletter now and get exclusive access to my collected GPS tracks as well as all the brief information about my articles.
Those who want to do the hike to the Risco Blanco in addition should plan another 1,5 hours. The whole hiking tour from El Molledo in direction to Lomo del Cabezón takes a good three hours.
Length of the route
The hike from Tamaimo with a round over El Molledo is 5.8 kilometres long.
The hike from El Molledo to Risco Blanco is 2.1 kilometres per way. In direction Lomo del Cabezón on the rock plateau it is then already in addition scarcely 6 kilometres from El Molledo.
elevation profile Tamaimo - El Molledo - Tamaimo
Difference in altitude
The difference in altitude amounts absolutely with up and from approx. 320 height meters.
Teno hike - elevation profile
The hike in the direction of Lomo del Capeza has alone approx. 430 height meters in the ascent and descent. And if you continue you can easily add another 100 meters. But those who only go to the Risco Blanco can save some altitude meters. It has only about 120 meters in the descent and ascent.
Requirement
Predominantly easy hike on good hiking trails and paths. The extension from Risco Blanco then rather for advanced hikers with sure-footedness and a head for heights.
Refreshment
Refreshments are only available in the bars, restaurants and cafés in Tamaimo. There is no place to stop for refreshments on the way. Therefore please bring enough water with you. Those who walk the way from El Molledo to Risco Blanco will pass a spring where water can be bottled.
Hiking with dog
Variants to the Teno hike
This hike is consciously conceived as a small hike. But of course it can be combined and extended with many hiking routes around Tamaimo. Examples are the ascent to the Bujero rock gate or the tunnel tours.
Variant: track El Molledo - Risco Blanco - plateau and circle Tamaimo - El Molledo
But those who want to go a small round and only extend it a little can visit the white volcanic rock Risco Blanco.
Track El Molledo via Risco Blanco to the rock plateau
Those who want to make the tour from El Molledo to the Risco Blanco as an own hiking tour can also start in El Molledo. The place El Molledo is located at the TF-82 between Tamaimo and Santiago del Teide. The journey takes place as described after Tamaimo. Parking is available in El Molledo around the church square. And also the Titsa bus lines 460, 462 and 325 stop in El Molledo.
And if you haven’t had enough after visiting the Risco Blanco, you can descend further on the mountain ridge between the Barranco Seco and the Barranco Natero.
Easy hiking tour through the Teno Mountains from Tamaimo via El Molledo
Section Tamaimo – Barranco Santiago
You can start this small hike at the big intersection in Tamaimo or at the easy to find church in Tamaimo (approx. 570 m altitude). Those who start at the crossroads walk about 30 meters along the road towards Santiago del Teide. Then turn left onto Calle Santa Ana, which leads to the church. Continue straight ahead along Calle El Agua. Follow this road and turn left at the next street after a public water point.
signpost in Tamaimo
There is already a sign to the hiking trail to Cruz Misioneros. Follow this and you will quickly reach Barranco Santiago via a small path. There you meet the Camino Real, which leads from Los Gigantes to Santiago del Teide (PR TF-65 marked yellow-white). Follow this road in the direction of Santiago del Teide. Cross the Barranco bed, climb up on the other side and turn right towards Santiago del Teide instead of left towards Cruz de Misioneros.
Section Barranco Santiago – Degollada del Roque
The path goes uphill on the left side of Barranco Santiago. Very quickly you pass the last houses of Tamaimo and leave the village below you. After 1.5 kilometres you will come to a fork in the road. Continue straight ahead to Santiago del Teide. However, turn left and follow the PR TF-65.3 towards El Molledo. The road now climbs a little steeply up the mountain in wide serpentines. After a short time you reach the mountain ridge (Degollada del Roque) at an altitude of 770 metres.
View on the Degollada del Roque
In front of you already the striking bright volcanic rock of the Risco Blanco rises. On the left, the hiking trail continues into the Barranco Seco or over the Barranco Seco to the rock gate El Burjito. After you have enjoyed the wonderful view of Barranco Santiago and the entire Barranco Seco with Risco Blanco from up here, you continue to El Molledo, signposted on the right.
Junction on the hiking trail PR TF 65.3
Section Degollada del Roque – El Molledo.
Already on the Degollada del Roque you have made the greatest effort in the ascent. From here you continue on a hiking trail on the left side of the slope. A slight up and down follows, where you can enjoy wonderful views of the entire area around the Risco Blanco and into the Barranco Seco. After some time, a path marked with a white chalk arrow branches left uphill. This leads over the mountain ridge with a bit of climbing further uphill. Later this path joins the El Molledo hiking trail to Risco Blanco.
Article summary and large selection of GPS hiking tracks
Sign up for my newsletter now and get exclusive access to my collected GPS tracks as well as all the brief information about my articles.
Continue straight ahead and walk along the right side of the slope. Below you can see the Camino Real, which connects Tamaimo and Santiago del Teide. The path leads you straight ahead and rises only moderately. After some time you pass a small lonely farm on your left, which you can see from a distance. The small village El Molledo is already in sight. On the way you have to take a wide right turn over rocks and continue to the crossroads over El Molledo.
Teno - Camino Real between Tamaimo and El Molledo
Section El Molledo – Tamaimo
You are now at the crossroads over El Molledo. From here the Camino Real with the PR TF 65 (white-yellow) continues to Santiago del Teide. On the left the PR TF 65.1 leads from El Molledo to Risco Blanco. More about this later. If you want to do the small hike without any variants, you can simply take the PR TF 65 in the direction of Los Gigantes.
hiking crossing close to El Molledo
The trail leads you downhill in steep hairpin bends directly under Molledo. Once you have completed the steep descent from El Molledo, you slowly descend on the wide Camino Real through the Santiago Valley. After some time you will reach the fork in the road that has led you up to the Degollada del Roque. Now you simply continue straight ahead on the path you came to. After some time you will be back in Tamaimo.
Option: From El Molledo to Risco Blanco
El Molledo section – crossroads for hikers
If you would like to make this tour as a separate hike, it is a good idea to start in El Molledo at the church square. From the church square, walk along Calle La Calzada through the village to Barranco Santiago. After a short time you will reach the first hiking crossroads, cross the Barranco and on the other side of the valley you will reach the aforementioned hiking crossroads.
Teno - signpost Risco Blanco
From here it goes with the PR TF 65.1 in 2.1 kilometers to the Risco Blanco. The way is not to be missed. It always leads along the left side of the slope along the PR TF 65.3 hiking trail (described above). So if you want to expand from the original route here, don’t go back to Tamaimo yet, but turn onto PR TF 65.1.
Section of hiking crossroads – foot of Risco Blanco
The village of El Molledo lies at an altitude of 880 metres. On the way, the left side of the slope is now slightly up and down, slowly and leisurely. The path leads over some rock slabs and turns west after some time. Below you lies the Santiago valley and you can enjoy wide views over the village of Tamaimo to the coast.
Spring between El Molledo and Risco Blanco
The trail passes a spring, the Fuente de Tenerguera. If you have a dog with you like me, you can also enjoy water for the animal. A short time later, the path leads you upwards over a red rock massif. Here are a single finca and a few abandoned ruin houses (hamlet Los Quemados). If you have circumnavigated the finca on a narrow path, you stand on a small rock plateau at about 980 meters altitude. From there you have fantastic views of the Barranco Seco and the Risco Blanco. From up here it goes downhill on a small path. First to the left, then to the right and then again to the left of the slope, the path leads you quickly downhill directly to the saddle in front of the foot of the Risco Blanco.
the white volcano rock Risco Blanco
Short Route description Risco Blanco – direction Lomo del Cabezón – Teno part 1
Here in front of the Risco Blanco with view in all directions a small rest is worthwhile. People with climbing experience also love to climb the white volcano cone from here. A small path on the left side leads to the height of the 920 meter high „volcano giant“. From the location it goes approx. 50 meters high. Who has seen now enough, can return on the same way to El Molledo or also Tamaimo.
view from the plateau direction Teide
Those who want a little more and are not afraid of small narrow paths can now descend to the right in front of the Risco Blanco. It goes first in narrow serpentines that are now and then a little bit oily at the foot of the Risco Blanco further downwards. When you reach the bottom, you cross a small plain and continue along a narrow path marked with cains on the right side of the slope.
Teno - view to Risco Blanco from the path Lomo de Cabezón
Route description Risco Blanco – direction Lomo del Cabezón – Teno part 2
After some time the valley widens a little and you reach a kind of plateau, which you cross. Then the narrow path on the left side continues downhill at the edge of the slope. When you have reached about 720 metres of altitude or about 2.8 kilometres from El Molledo, a small path branches steeply up the mountain on the left. If you go straight up there, you will reach a wild rock plateau in a short time. Here you can rest and enjoy beautiful views of the southern Teno mountains. You won’t hear any noise except nature. A wonderfully lonely place to linger.
Teno - hiking path to Lomo del Cabezón
I normally go back from here. But if you are a real „climbing maxe“, you can also descend from there. At a height of about 620 meters it will stand at the head of the mountain ridge. Here is the edge, from which the Barranco Seco is on the left and the Barranco Natero on the right. On the way back, however, you will have to climb a few metres. Because there is no further way.
view from the Degollada del Roque in the Barranco Seco
And finally
I hope that in this hiking mixture today there is also the right thing for you. The main hike with a few metres of altitude difference on good wide paths should really be possible for everyone. Here are some film impressions. And also the tour from El Molledo to Risco Blanco is easy for beginners. Further ascents and descents at the Risco Blanco I would recommend only to the advanced.
agaves at the hiking path
And now I wish you a lot of fun hiking in the Teno mountains,
Dagmar von SiebenInseln
Thank you for reading!
If you've found my hiking guides on SiebenInseln helpful for your Canary Islands adventures, please consider leaving a small tip. Your support is greatly appreciated and helps cover the costs of maintaining this blog.