The Risco Blanco is located in the Teno Mountains and separates the Barranco Natero and the Barranco Seco with its offshore mountain ridge. Today I would like to present some hikes from El Molledo on and around the beautiful white volcanic rock Risco Blanco.
Map
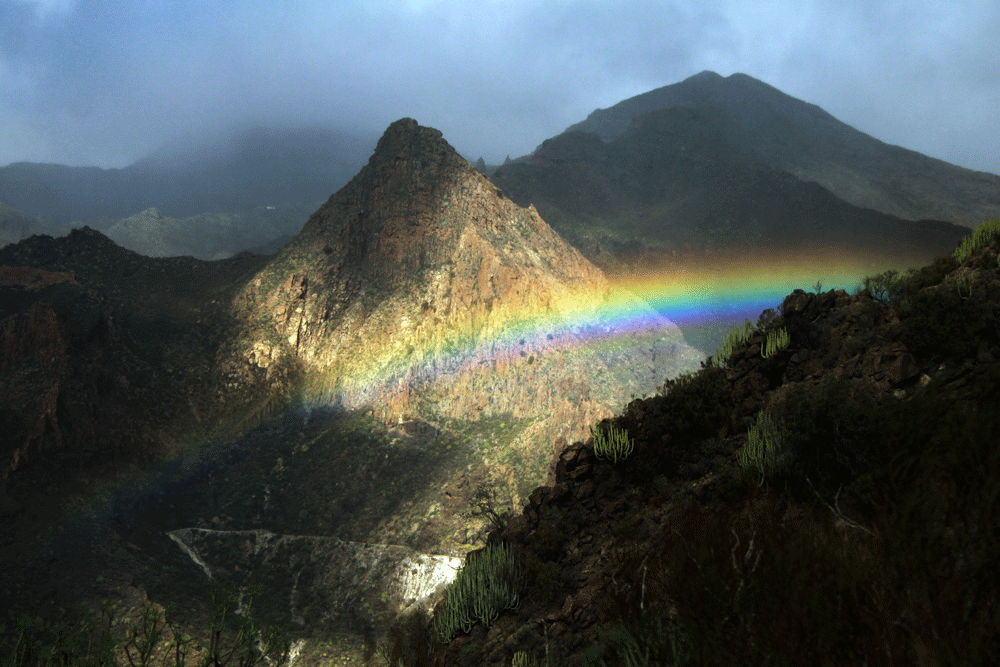
Risco Blanco with La Gomera in the background
But if you want to do more than just a little hiking, you will get your money’s worth in the area around Risco Blanco. Climbers can conquer the summit. And you can also hike to the rocks and plateau in front of it. Wild goats can often be seen there.
Wild goat on the summit plateau close to Risco Blanco
Today I present a circular hike from El Molledo with a summit ascent. But even if you don’t want to climb to the summit, you have several options to visit the white volcanic rock. The hike offers the possibility to descend at the foot of Risco Blanco and hike to the lonely mountain ridge in front of it. You will descend a few metres in altitude on winding paths, which also have to be conquered uphill again. And if all that is not enough, there are countless hiking trails around the starting point El Molledo and the Risco Blanco, which can be combined well with the hike to the Risco Blanco.
back of Risco Blanco - view from the summit plateau
El Duce and the Risco Blanco
A local greengrocer told me many years ago that the Risco Blanco was also called El Duce. Of course I wanted to know what the reason was. He said that Franco was also called El Duce. And the Risco Blanco has similarities with the profile of the former dictator. Is that so? In any case, I asked some older native villagers in Tamaimo and El Molledo and they all confirmed this story for me. Then maybe there is something to it. Find your own opinion. But now to the hike around the white volcanic rock.
Risco Blanco Massiv
General information about the hike around the Risco Blanco
Starting point and approach
The starting point of the hike to Risco Blanco is the church square of El Molledo (small village at 880 m above sea level), which is located on the TF-82 between Tamaimo and Santiago del Teide.
Starting point church in El Molledo
Arrival by car
El Molledo can be reached via the TF-82 from Los Gigantes or Santiago del Teide. From the south you can also take the TF-1. Then take the exit at the end of the motorway and drive in the direction of Los Gigantes. In the village and around the church square there are plenty of parking spaces.
postsign Risco Blanco
Arrival by bus
The Titsa bus lines 325 (Puerto de la Cruz – Los Gigantes), 460 (Icod de los Vinos – Adeje), 462 (Guía de Isora – Los Gigantes) stop in El Molledo. You can find more information on the Titsa Homepage.
Time
I don’t like to give general times for hiking tours, as the times are very individual. If you only want to hike to the foot of Risco Blanco, you will need about 2.5 hours to get there and back. In case you want to hike further up to the rock plateau, you should allow about 1 hour more. If you are a bit more athletic, you can complete the round tour with summit ascent and descent to the plateau in a good 4 hours with an extensive rest.
elevation profile El Molledo - Risco Blanco - summit plateau
Altitude profile of the circular hike with summit ascent and excursion to the plateau
Difference in altitude and distance
Article summary and large selection of GPS hiking tracks
Sign up for my newsletter now and get exclusive access to my collected GPS tracks as well as all the brief information about my articles.
The difference in altitude of the easy trail is approx. 340 metres gross with up and down. The distance to the foot is just over 2 kilometres and to the rock plateau a little over 3 kilometres (outward and return therefore just over 4 and 6 kilometres respectively).
The difference in altitude of the circular trail with summit ascent and hike to the plateau is approx. 550 metres and is just under 7 kilometres long.
hiker on the trail TF PR 65.1
Requirement
The hike to the foot of the Risco Blanco and also the circular hike as such are classified as easy. They are relatively manageable hikes on good and signposted hiking trails. But if you want to continue down to the ridge of Risco Blanco and climb up to the rocky plateau in front of it, you have to reckon with impassable paths in places. Here, sure-footedness and a head for heights are absolutely essential. The path is also not always easy to find. If you want to climb to the summit of Risco Blanco, you need to be sure-footed and free from vertigo, and you may have to scramble a little.
Refreshment
There are restaurants, bars and shops only in Santiago del Teide or Tamaimo (some kilometres away from the starting point). In El Molledo there is a small local supermarket. Therefore, take enough water and food with you.
You can decide for yourself whether you want to do the circular hike or just the „easy“ hike to the foot of Risco Blanco, or whether you want to hike further up to the rocky plateau in front of it. If you dare and are confident enough, you can also climb to the summit of the white volcanic rock from the foot of Risco Blanco. The path to the summit starts at the foot of Risco Blanco and goes up the rock on the left.
On the track you will see a track marked in orange. This is a small variation of this tour. You can walk half way back to El Molledo over a rocky plateau with beautiful views towards Tamaimo. Here you have to be sure-footed on the small path. The trail ends on the normal hiking trail over the height of Tamaimo to El Molledo. There you can turn left and walk back to El Molledo in about 20 minutes.
Track hike El Molledo - Risco Blanco - plateau
Track of the Risco Blanco circular hike with summit ascent
Hike around the Risco Blanco
El Molledo section to the waterhole
The starting point of this hike is the church square in El Molledo. From the church in El Molledo, go straight ahead along Calle La Calzada and at the end of the village you will reach Barranco de Santiago, which you will cross. Here you cross the Camino Real, which runs between Los Gigantes and Santiago del Teide. On the other side of the Barranco, after a fork in the road, you go uphill. To the right is the path to Santiago del Teide. Go straight on and follow the signs for Risco Blanco (Trail 65.1), which you cannot miss. There are large signs at the crossroads.
Hiking crossroads in El Molledo and Teide in the background
Alternative paths
The hiking trail is initially easy and later also steep in some passages uphill across the slope. The path is easy to walk, not exposed and easy for hikers to find. This may also be the reason why a hiker is never completely alone up here. Relatively often you will meet individual hikers, but also whole groups. At one point the path forks and you have two possibilities. Either you go up the steep path on the right, where there is a crossed out cross at the front. There you have to climb up narrow rock steps. Or you can continue straight down on the hiking trail.
Old fountain with inscription from 1936
On the Track you can see that I went both ways.It is on the way up right and on the way back down around. On the lower way you pass a waterhole, from which the inhabitants of El Molledo partly get their drinking water on foot. Try the water – it tastes really refreshing and cannot be compared to the taste of the water bought from the supermarket. If, like me, you have a dog with you, you can fill it up with a little water. I really like this place around the water hole. You find an old stone with an inscription from 1936. But as you can read on it – always turn the tap off again.
hiking path Risco Blanco to the summit plateau
Section watering place to high plateau
You follow the path until you reach the pass at about 1000 meters altitude. On the pass you have a magnificent first view of the Risco Blanco and the Teide behind you. A path leads straight on. This is the path marked orange in the track, which you can take as a variation on the way back if you want to climb a bit. But now you turn right to the Risco Blanco. After some time you come over red rock and shortly after you pass a lonely finca. You bypass it on a narrow path. And then you stand on a small plateau with some ruins.
lonely situated finca behind red rocks
From here you have a fantastic view of the Risco Blanco and can look into the Barranco Natero from above. If the weather is good, the view extends far over the Teno mountains and to the neighbouring islands of La Gomera and La Palma. The ridge in front of the Risco Blanco is also clearly visible and you can walk down to it.
Article summary and large selection of GPS hiking tracks
Sign up for my newsletter now and get exclusive access to my collected GPS tracks as well as all the brief information about my articles.
You circle around the ruin and follow the path steeply downhill. First you go down in serpentines. Then change sides on the ridge from left to right. On the right side of the slope you continue downhill. And in about 20 minutes you will be standing directly on the small saddle in front of the Risco Blanco. The official hiking trail to Risco Blanco ends here. A hiking board gives explanations and the place is suitable in the best way for a rest.
View to the Guergues Steig on the opposite side
Now you are after up and down again approximately at the starting altitude (850 altitude meters). Immediately below the huge volcanic rock you can enjoy the view in all directions. Peak climbers can now climb the Risco Blanco directly from here. If you have had enough, you can take the same path back to El Molledo or take the branch (marked orange) over the rock formation to Tamaimo.
descent Risco Blanco - deep down the Barranco Natero
To the top of Risco Blanco
If you want to go to the top of Risco Blanco and do some climbing, follow the path at the foot of the mountain on the left, slightly uphill. It leads you gently uphill and downhill along the foot of Risco Blanco. After a short while, the path turns steeply right and climbs up the yellow rock. The path is very narrow and you often have to climb over large stones and rocks. You cannot miss the narrow ascent path, as it is well marked with cairns and partly also with coloured arrows.
Impressive views from the summit of Risco Blanco
The higher you get up the rock, the more you have to scramble. In between there are two cross passages. But then you have made it and are standing on the plateau of the white volcanic rock. From up here you have a fantastic panoramic view. In addition to Teide and the south coast, you can also see deep into the surrounding gorges. Deep below you is the White Channel and also the plateau and the bizarre rocks of white volcanic stone, to which you can still hike after the summit climb. A little caution is advised on the descent, as there is a lot of scree on the narrow paths on which you can easily slip. But for all those who love summits, the volcanic rock is indeed a real highlight.
View from top of Risco Blanco to Mount Teide
Section foot Risco Blanco up to a rock plateau
If you still want to go a little further (perhaps after the summit tour) and are not afraid of narrow, partly overgrown paths, you can now climb down from the main path to the right onto a small path. I write climb because during my last visits (last update November 2021) this path had actually slipped a bit and we had to scramble over scree and slipped bushes and stones. The small path leads you past Risco Blanco on the right. It descends steeply. At first the path runs straight and then in small serpentines. There is also a small rocky passage.
view to the summit plateau above the Barranco Seco
When you have reached the bottom of the rock, you change to the other side of the slope. Now you follow a path that runs directly along the slope and is partly marked with stone figures. On the side of the slope it goes straight ahead for a while, partly through bushes. Then you reach a rock plateau. You cross the rock steps on the path marked Steinmännchen downhill.
Section rock plateau up to the mountain ridge in front of it (plateau)
From the large rock terrace, turn left until you reach the mountain ridge. Follow the ridge downhill on the right side of the slope on a narrow path. Here the path is mostly very overgrown. On your right is the Barranco Natero and on your left the ridge in front of the Risco Blanco. You walk downhill until you reach an altitude of about 700 metres. Then the small path continues straight ahead. There you can work your way further down the ridge. At some point the path ends, so at the moment it does not seem possible to reach Barranco Natero.
ascent path to the summit plateau
However, you follow a very steep stone-stepped path on the left. In a short time, this will take you steeply up to the rocky outcrop in front of Risco Blanco. At the top, you will find yourself on a large rock plateau on the ridge. There, at 760 metres, you can enjoy a wonderful view in all directions. On the left you can see down into the Barranco Seco and on the right into the Barranco Natero. This is an ideal place to rest and have a picnic, surrounded by jagged rocks. And if you are very lucky, you will meet wild goats there.
Stone path to the plateau behind Risco Blanco
Route section rock plateau to starting point Hike El Molledo Church
Once you have descended from the plateau, you must hike the same way back up to Risco Blanco. From there you can hike back the same way you came or the alternative routes suggested above. If you want to do a round trip, walk uphill from the foot of Risco Blanco for about 100 metres. Then a path branches off to the right. Follow this downhill. In a wide arc it takes you high above the Barranco Seco with a view of the Risco Blanco, finally back to the main hiking trail TF Pr 65.3 to El Molledo.
Wild goat on the summit plateau
Keep to the left and walk in a very long arc along the side of the slope. You continue to have beautiful views of the Santiago Valley and the Teide. You pass an abandoned finca. Finally, at a junction, you meet up with your outward route to Risco Blanco TF PR 65.2. From here, it is only a short way downhill to the village of El Molledo. Once in the village, it is only a few metres to the starting point of the hike at the church.
Hikers on the way to Risco Blanco
And finally
I hope you enjoyed the hiking tours around Risco Blanco. Just try out what is the best alternative for you. And if you meet a big old billy goat, please say hello from me. Have fun hiking
Dagmar von SiebenInseln
Thank you for reading!
If you've found my hiking guides on SiebenInseln helpful for your Canary Islands adventures, please consider leaving a small tip. Your support is greatly appreciated and helps cover the costs of maintaining this blog.